Pages

Tuesday, March 30, 2010

My not so secret anymore garden!

It's no secret anymore that our two favorite things to grow around here are gardens and babies!

Look what we absolutely devoured this weekend, and it was straight from our garden. This was the most flavorful and almost sweet tasting cabbage I've ever had. Even my 2 year old couldn't get enough. I guess the fruits of your labor taste good at any age!


The best part is that I know it's truly organic, not just packaged differently and slightly more expensive :)


Next to harvest:
Carrots, onions, garlic, snap peas, beans, lettuce, cucumbers, tomatoes, strawberries, squash and lots of herbs.

I can't wait for dinner at our house when it's all in!!

The Daniel tee

This is just a little something I have lion around!

This is probably my favorite applique I've done so far!! I LOVE how the lion turned out. I made it in a 9 month onsies thinking that I had too many in 6 months. Who would've thought it'd end up being my favorite and now I just cannot wait for it to fit Jonah!

Sunday, March 28, 2010

Everyone knows that kids grow like weeds

But did you know their shirts can too?!


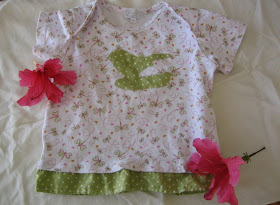
This was a cute little Le Top dragonfly tee that was given to Sienna when she was 9 months. Unfortunately, my long-torso-mini-me didn't end up wearing it too often, because it was always a tad short on her. Have no fear, nothing goes to waste at our house! This little tee lived in our hand-me-down tub until a few days ago when I came across this adorable green polka dot fabric... It's funny how things are just meant to be even with fabric and abandoned kid's clothes!

You're probably thinking that it's a day late and a dollar short since my daughter is now 2 years old, the dragonfly shirt is for an infant and I started this by saying that kids grow like weeds, so something doesn't work here!


That was what I thought at first until I re-discovered the shirt's super wide neck line that I was able to open up just a tinsy bit more, which was plenty to fit over her head and shoulders. 9 month into a 24 month tee!! I LOVE IT!


The shirt was still short, which is where I got to use my new fabric to add extra length on the bottom. I also wanted a little more width, so I lightly ruffled the top of the fabric piece before sewing it to the tee. This created a nice flair without dominating and already busy shirt. Last, but certainly not least, I added a simple little birdie applique to tie it all in!

Thursday, March 25, 2010

Watch my sheep tee

I feel a little sheepish (I couldn't help it!) about borrowing this adorable lamb pattern from a pillow idea by The Purl Bee, but was just too perfect! I've been wanting to do a lamb or sheep applique for the longest time and wasn't sure how to make it white, but still pop off the shirt and then I came across the pillows yesterday and couldn't wait for nap time to try it on a shirt! The simplicity is cute yet elegant and I just can't get enough of the little ear popping out.


Who wouldn't want to watch over their sheep in this number!?

Tuesday, March 23, 2010

Ruffle your tail feathers

We went to the Children's Museum today and I saw these cute little material birds hanging from the top of a play structure in the children's room and thought, hey, I could make something like that! So thank you to the museum for the great inspiration. And also for tiring out both of my babies so much so that they took a nice long afternoon nap, which gave me just enough time to test it out.


There are a few things I want to try with my next one, but I think it turned out pretty cute! The best part is that it's used with all recycled material. Wanna try?

Step 1: Flatten abandoned sock and draw an outline of a bird on the foot of the sock like below. You can leave the toe of your sock, but this sock didn't seem to have the best bird head, so I cut it out.

Step 2: Sew the toe side of your sock together by hand or machine depending on the material of your sock. I did it by hand in this one.

Step 3: Fill the sock with stuffing material about 3/4 full to leave room for a ruffle tail. I used stuffing I had on hand, but if you don't have any you can use cotton balls.

Step 4: Sew a circle around the bottom (ankle region) of the sock using a long and loose straight stitch. Hold the beginning of the thread tight and pull the other end to close the section and create a ruffle. When you are finished you should have something that looks like this:

Step 5: Close the bottom of the tail with a zig zag stitch by hand.

Step 6: Making 2 wings for your bird. I free handed a wing on a piece of felt and used it as a pattern to make a second matching one. Trace a slightly smaller wing shape on my left over sock material to accent the felt wing. If you don't have felt you can just make a double layer of sock material and stuff it for extra thickness.


Step 7: Sew the sock wing onto the felt wings using embroidery thread or doubled regular thread. Start your first stitch at the bottom of the wing so you can hide the knot when you attach the wing to the bird. I did this by hand and simply attached the wing with the same thread when I got back to the end of the wing.

Step 8: Use the same technique as Step 4 to section off the head from the body.


Step 9: Add a beak and eyes. I used an obtuse felt triangle for the beak and sewed on a little colorful yarn for the eyes.

Step 10: Add a little extra flair- add some beads, a little string to hang it with, maybe some feet anything you like! I can't wait to try another one.


Boy, time really flew by with this project... hehe

Monday, March 22, 2010

The Sower tee

I finished the "Sower" shirt for my little gardener this weekend and she just could not stand the wait to wear it... so finally this morning she had her special dress-up party debut.


"Ready Mommy?"


"Eeeeee! I LOVE it!!"


Should I let her keep the shoes?

Saturday, March 20, 2010

Oh this old thing, it's my gardening dress


Old tank top that's too small, some remnant fabric and an hour to spare... perfect!

I only used 1/2 yard of fabric, a little lace trim, colorful string and some red little buttons and voila! a lovely little dress just right for gardening in. This was the first dress I made for Sienna last summer in a 18 month size, but because I used a shirred top it still fits her now just a tad shorter. What's shirring? Check out Disney's awesome tutorial. Why reinvent the wheel right? I love it!

Friday, March 19, 2010

When the pie was baked the birds began to sing


It's hard to say exactly why Sienna just loves baking this pie with me.
Is it because I let her sneak all the fresh strawberry samples she wants? Or is it because we both giggle incessantly as we belt out Sing A Song of Sixpense? Either way, it made for a great afternoon and an even better evening when we got to enjoy it with our friends.

This is one of the best gifts Kevin's mom has given me (except her son of course). It's her family recipe and an absolute hit every time.

Wanna try?

Crust
Mix together:
1 stick of margarine or butter
1 cup and 2 tablespoons of flour
1 tablespoon of sugar
Pat into pie pan and bake at 350 until golden brown. Trust me, you'll smell when it's ready! I'd say around 15 minutes.

I use the time that the pie crust is cooking and cooling to room temperature to make the filling.

Strawberry Glaze filling
Mix together and bring to a boil on the stove:
1 cup of water
1 cup of sugar
2 heaping tablespoons of cornstarch
1/2 package of sugar free red jello (I use strawberry, but any red would be fine) or 2 1/2 tablespoons from a package of regular jello

Once it reaches a boil remove from heat and allow to cool to room temperature. Resist the urge to put in the fridge! It works better to be patient. Use this time to cut fresh strawberries into slices.

Fill pie pan with strawberries and pour room-temperature-glaze over the berries. Place in fridge to set for about 3 hours.

Thursday, March 18, 2010

Every Jonah needs a whale tee

Whale shirt that is!


When you decide to name your son Jonah you're just opening yourself up for all the whale jokes you can imagine. And...secrectly...I loved it! Whales are cute and quite peaceful about their size, plus there are worse things to be called. Like if you named your daughter Betsy (the cow)... I'll take a little white whale on the go.

The day after a holiday is the perfect time to stock up on shirts for this kind of project. Good-bye St. Patty's day clover, hello baby beluga!

Using an abandoned onsies? Perfect! You can easily resize the body of the whale to cover up any awarkardly shaped stains.

This is one of the easiest and quickest appliques I've done so far. And adorably cute even if you're baby's name isn't Jonah :)

Tuesday, March 16, 2010

For my casual gentleman

As fate would have it, shortly after my great discovery of abandoned onsies I stumbled across one of my favorite blogs of all times, Ruffles and Stuff! I just love Disney, the mastermind behind some of the most creative and simplest crafts that even I can do. It was near Christmas and someone was showcasing little shirts with tree appliques on them. I thought, wow that looks like a tie! How cute would that be? Much like my husband who swears he invented grilled cheese sandwiches, I thought I stumbled upon gold!

Of course there just aren't too many original ideas out there anymore and a few scrolls later I saw that someone beat me to it. Still, a good idea is a good idea and I managed to put my own little spin on it.


Now that's one tee you could wear for any occasion!

Monday, March 15, 2010

Sew blessed

It sounds ridiculous, but there are a few things I've always desperately wanted in life. One of them was to be just a tiny bit shorter, but since that's not very likely I consider myself indescribably blessed to already have most of my other prayers answered!

The first and probably greatest wish in my life was to find my Mr. Hot Stuff, get married and get started on growing our little family. Done and doing... But the other little dream I should fill you in on was that I also always secretly wanted to be like our mothers and grandmothers and make handmade, and yes, sometimes matching clothes for my many babies. Picture a remake of the Sound of Music. Well... once the first act got rolling I realized that having babies and having them considerably close together left me with 1) not a lot of time and 2) even less money. So I had to get creative!

I started scrounging the house and even digging through my husband's "bachelor clothes" drawer for anything I could sneak away to my sewing stash.

When Kevin threatened to use our nice guest towels (and his Jedi powers) to wash the car if I didn't leave his t-shirts alone I had to find another way.

Lucky for me our son had just been born and was too young to covet, let alone have any yucky hole-ridden bachelor clothes, but what he did have instead was a fresh box of hand-me-downs that I had been collecting for the past 9 months. Not surprisingly, I found a bunch of practically brand new outfits sprinkled with random baby type stains. I get it, I'd been there with our first. With your first baby everyone loves buying you newborn outfits, so much so that you end up with more newborn clothes than days for the child to wear them. Naturally, when one outfit gets a little stain you're more likely to toss it in the another-man's-treasure bag than you are by the time they are less cute and less purchased for by others.

The abandoned onsies were the answer to my prayers. I started making little appliques to cover the stains and voila a practically new onsies with a handmade twist! I was hooked.