Showing posts with label No Sew. Show all posts

Wednesday, January 26, 2011

A Mary Poppin's birthday party

Come join us as we look back at Sienna's Jolly Holiday 3rd Birthday Party!

We celebrated Sienna's 3rd birthday 2 weekends ago and had the party at this wonderful train park in Scottsdale with an almost Mary worthy magical carousel and everything! The down side to the practically perfect location was having to get there at the crack of dawn to reserve your spot, so from the wee hours of the morning that I opened my eyes til the last guest was gone it was Step In Time!

So please pardon me for the picture quality here... hosting 3 year old birthdays in a park is a little crazy without even trying to take pictures, but I'd say if you love to laugh then keep on scrolling for some fun and goofy pictures, plus a few pretty good Mary Poppins theme party ideas if I do say so myself!

First there were costumes....

Mary Poppins (scandalously pregnant) and Jane

Despite the particularly warm, sunny day of 75, "Jane" stayed in costume all day and for, well, I do believe she still thinks she actually is Jane.

I don't think we helped by letting her call her brother Michael, although he was more interested in drinking his first CapriSun than dressing up like Mary Poppins characters.

In case you don't think I'm a bad enough mother for giving my 1 year old a CapriSun, I made sure that everyone else had spoons full of sugar to help the medicine go down.

Sienna actually helped me make these out of melted white chocolate and red sprinkles! Super easy and the kids LOVED them!


Next, what would a Mary Poppins' party be without umbrellas?

I found these PERFECT while umbrellas from the Oriental Trading Company that you can actually decorate yourself!

I had to admit that these didn't go exactly as planned... I wanted to make ruffles to sew along the bottom of each one like a real "Jane" umbrella would be out of a water-proof shower curtain, but you can't do every good idea you have I supposed! Even still, I think it's a nice token or tuppence for everyone to take home!


Don't worry the boys had fun at this ultra girlie fest too!


I laid out long strips of butcher paper I've been saving since I stopped teaching for just the right occasion, such as, needing long "side walks" for the kids to draw magical chalk pictures to jump into.

That, and the really cool real KITES (also from the Oriental Trading Company) that they got to decorate themselves too!!

Then after we decorated them....

You guessed it!!

Let's go fly a kite!


Up to the highest height!

And send it soaring!!

It's been a week since the party and the soundtrack only played through 2 or 3 times during the party, but I still find myself singing silently in my head all day :)


And finally, last, but not least...
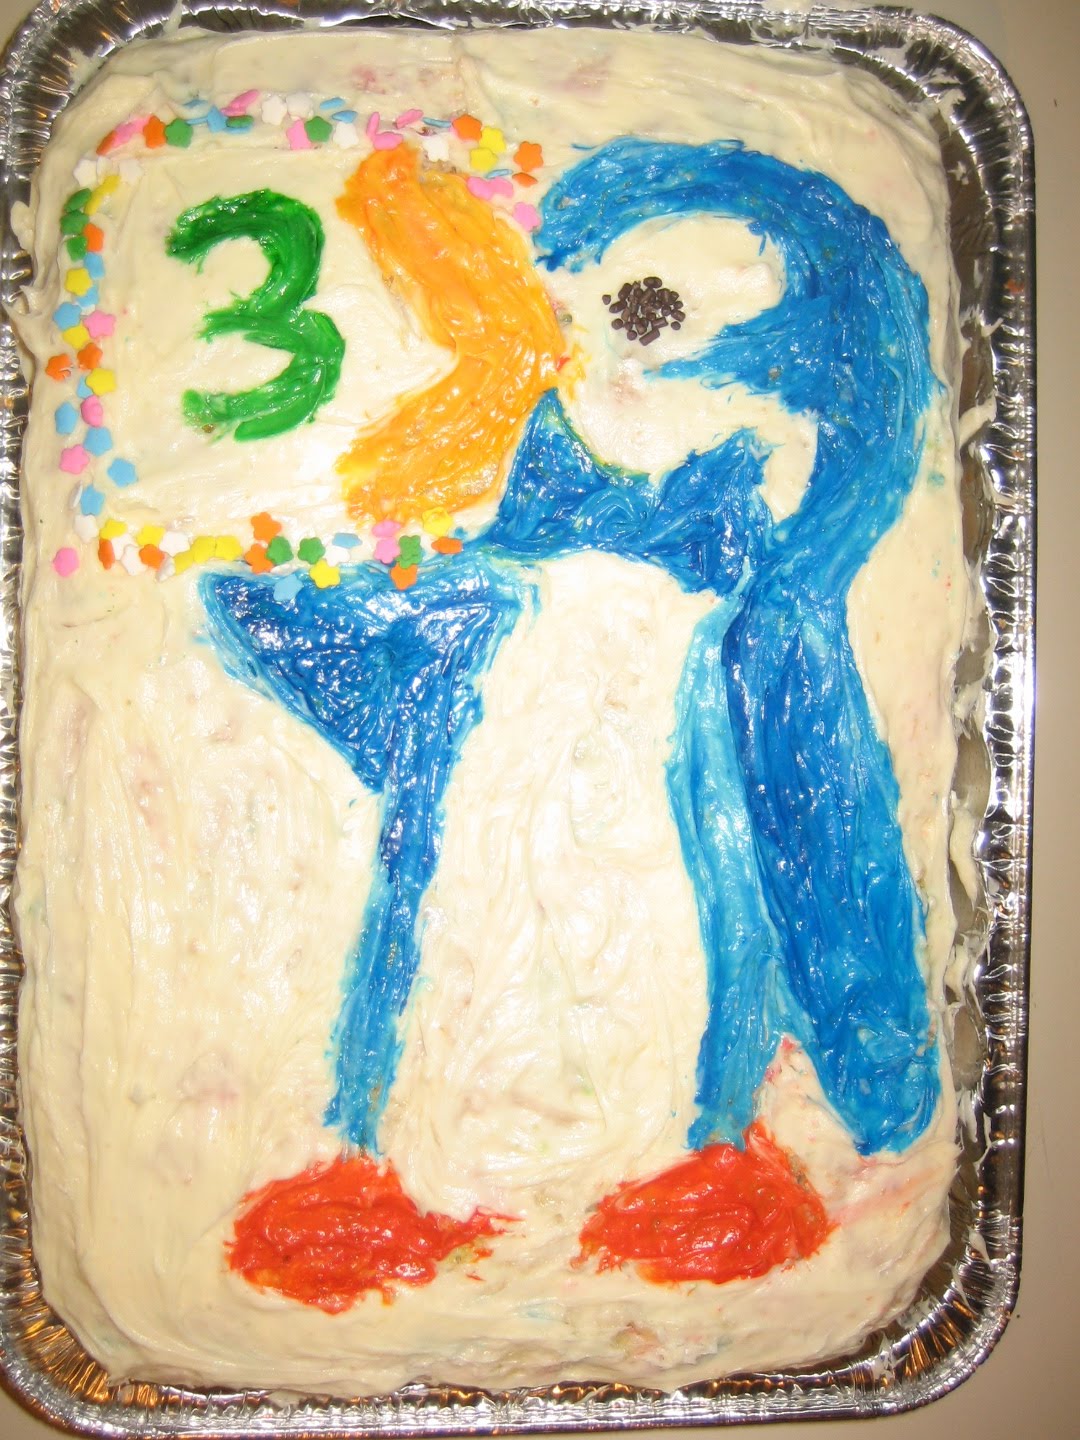

We finished off the day with Funfetti Penguin cake for all!

It's supposed to be the Jolly Holiday penguins with the menu...

Don't laugh, it was the best I could do with limitations of frosting, food coloring and trying to involve a very excited almost 3 year old!


Sienna had been begging for a Mary Poppins theme party for months and months. When I couldn't persuade her to go for something like Strawberry Shortcake or a little easier, I started hunting all crafty corners I know for Mary Poppins theme party and ideas and was quite surprised by how little I could find online.

I did find this ADORABLE professionally photographed party that set the bar far higher than my highest kite would reach on a practical budget. But if you're looking to do a Poppins Party I recommend checking it out for some more fancy ideas...


Such as these scrumptious candied applies, but I decided our age group wasn't the best for something like that... or, adorable as it was the real tea set for that matter!


Now, truth be told, there was one other tiny little part for the party that got left behind, because I simply ran out of time! But I think it would've been so cute and easy that I just have to tell you about the cute little carpet bags I was sewing for all the party favors!! They just didn't get done in time... but can we still say it was the thought that counts??

All things considered I'd say the party was very
supercalifragilisticexpialidocious!

Thursday, December 23, 2010

Quick n' felty stocking stuffers

Need last minute stocking stuffers for your teddy bear little princess?

I thought these felt treasures were the perfect, quick, last minute and inexpensive stuffer idea!

...and I sort of hoped you wouldn't mind me using Miss Bear to model Sienna's future hair decorations just for now.


I put all 3 of these together in
oooh 15 minutes using pretty much felt scraps, glue and some old hair ties!

The head band is my personal favorite with the large teeth edge bow and a thin strip for band that I stitched to a scrap of thin elastic I had in my box of "don't throw away because you might use it for something somewhere sometime"
(hehe, glad I have that box now!)


I had some smaller scraps of pink felt about 1.5" x 3" that I thought would be perfect for a little pony tail holder bow.

Then I liked that so much that I fancied it up a bit for another brown one to go with this adorable dress I made her that you'll be seeing very soon....!


All I did for these pony bows is pinch together the square of felt (or 2 in the brown case), held it in place with a dab of fabric glue and covered up my messy work by wrapping around a thin strip of felt down the center. Just before I sealed the wrap with glue I stuck an old hair rubber band against the bow right under the wrap!


Since I give my ponies a tug and yank when I take them off... and so does the mini me in my life... I did do a couple of hand stitches to sandwich close the rubber band between the outer wrap and the bow. I used embroidery thread here, but I think any type of doubled up thread should be ok.


Don't you just love these easy little felt bows?!

I know I've seen these from a few different crafty bloggers out there, and I'm so sorry for not listing all of them, but I do know that I recently saw a great and simple tutorial for felt bow clips
over at Craftiness Is Not Optional.

Very doable at the end of a shopping budget!


Then... while I was starring at all those scraps of felt I remember the brilliant idea that I saw that I almost forgot about until just in the nick of time!

Felt baby doll diapers!!


Now these honestly are NO SEW at all!

Just a few snips, tucks and stick ons.

I made a few different sizes for her various dolls, but they're adjustable so they even fit her smallest baby pictured above :)

I saw these a long time ago from the lovely ladies at Kojo Designs and almost forgot all about them until now!

Check out their tutorial here.


Another 15 minutes for these guys and I still had half of a nap time to spare!

Go head, stop reading now and go try it!

BUT WAIT!

Before you go....

I also want to take a few minutes here to say that one of my favorite Christmas presents, any presents all year are all you wonderful bloggy world friends out there that give me more motivation, inspiration and fun than I ever imagined this crafty mommy blogging business ever would!!

Thanks so much for all encouraging comments you and the great ideas you all share!

Merry Christmas to all!!

Tuesday, December 21, 2010

Monkey see, Monkey love

And do ya blame me?!


When I saw Jess's clothes pin Christmas wreath tutorial from Craftiness Is Not Optional it was a done deal for me!

This was so quick and easy I couldn't believe it. I literally sprayed the pins while my kids played outside and they even helped me string the beads on the wire. This could be a great school craft project for kids to give to their parents... hum.... file that one away in my mental note box!


I did a few things differently than Jess, like spacing out the pins with 2 instead of one bead so the cards didn't overlap as much. I also didn't bother gluing... I might see why later, but it seemed to stay just find without it??

Hers looks fuller and a little better to be honest, but I didn't know how else to fit all these wonderful Christmas cards!


Speaking of which... I have a secret confession that I can now confess because it's completely a thing in the past....

I hate used to hate Christmas cards.

WHY?

Why would anyone "hate" Christmas cards.

One word:

c.l.u.t.t.e.r


What do you do with all those
lovely cards that collect in your "too nice to just toss out" pile?

Now I know!!!!!

And now I keep checking the mail obsessively hoping that we'll get more and more of them.

I love them so much now that I even, for the very first time since we've been married, sent out Christmas cards of our own with this cute Grinch smile from Sienna!


See :)

And because it's just me, I simply had to write a little poem to go with it.

Wanna read that too???

Of course you do or you would've stopped scrolling!


Twas a month before Christmas,

when all through the house not a Da Da was stirring, where was my dear spouse?

His boxers were hung by the laundry with care,

In hopes that I’d wash them for when he’s next there.


The children were nestled all snug in my bed,

While visions of sanity danced away from my head.

Two days had passed since he went on his way

to a new job in Portland, here with the children I stay.


When out on the lawn there arose such a clatter,

I sprang from the very far edge of the bed to see what was the matter.

Away to the window I flew like a flash,

To see a For Sale sign nailed down with a smash!


The bump on my belly of a new baby bro

Gave the lustre of change, much more than we know.

When, what to my wondering mind became clear,

that we’ll have 3 under 3! Oh me, oh my dear!


With a little walking Jonah, so lively and quick,

He’s all boy for certain, rough, tough and quite slick!

More fun with Sienna as she grows faster each day,

She tries hard to mirror mamma in every single way.


“No Sienna! No Jonah! Now Children please listen!

To sell this big house each corner must glisten!

To the park! To the zoo! Let’s get out of this place!

Can I do it? I must! Oh where’s my poker face??


And then, in a twinkling, I heard a small voice.

Your family and friends will help you;

for this just rejoice!

As I drew in my head, and wiped a small tear.

We have beautiful children & lots of reason to cheer!


So thanks to you all for the love and support,

We’re sad to leave Phoenix, our time was cut short.

But knowing the friendships we have just won’t end

A visit to Portland, may we subtly recommend???


You see... we have some big changes to announce this year, and you know, this Christmas card thing was a pretty convenient way to spread the word!

Thanks Jess for changing my heart about Christmas cards and for the great tutorial!


P.S. If you read this and think "HEY! Why didn't I get one this year? Well... this is my first year and I drastically underestimated how many I needed to order, so actually, only a very select few got them this time around. BUT, rest assured... there will be more. Oh yes, there will be more!

Friday, July 2, 2010

No-Sew 10 min Doily Top tutorial!


A tank top refashion in less than 10 minutes
that doesn't involve any sewing at all???

Of course!


It's so quick and easy, how could you not?


(Happy birthday to my beautiful sister!! Isn't she so cute?!)

This fancy little tank remodel makes the perfect homemade gift and takes just 10 minutes. But that's not even the best part of all, it's almost mess free to make and simple enough that Sienna helped me make the entire thing for her Aunt Dani's birthday present!

Here's what you need:
  • Any tank top new or old
  • Any shaped doily (I got this one from my grandma's junk drawer, but they sell them at the Dollar Store for well... $1)
  • An iron
  • Optional button or pin for the center
  • TOP SECRET NO-SEW AGENT- Magic poly web adhesive!! (I used the left over scraps from my Ikea curtains, but they sell this wonderful stuff at any Michaels, Walmart etc for a few bucks. Did I mention it's wonderful?)


Step 1
Press the doily in half so that it's nice and flat


Step 2
Fold the doily over the front of the tank so that one half of the doily is in the front and the other in the back.


Step 3
Carefully clip off any extra edges that don't lay flat on the neckline.


This might not be necessary, but depending on the type of doily you used you can dab a little Fray Blocker on the edges that you cut to prevent fraying. I didn't have to with mine, because I was able to clip along the string.


Step 4
Cut strips of the poly web adhesive to the length of the doily and carefully place between the doily and tank top.
Use one for each side on the front and back.


Depending on the shape of the doily, you can also add small pieces to the center and bottom.
A little of this stuff goes a long way.


Step 5
Set the adhesive by applying direct heat with an iron for a few seconds.

Don't forget to repeat for the inside of the tank top too.

Step 6
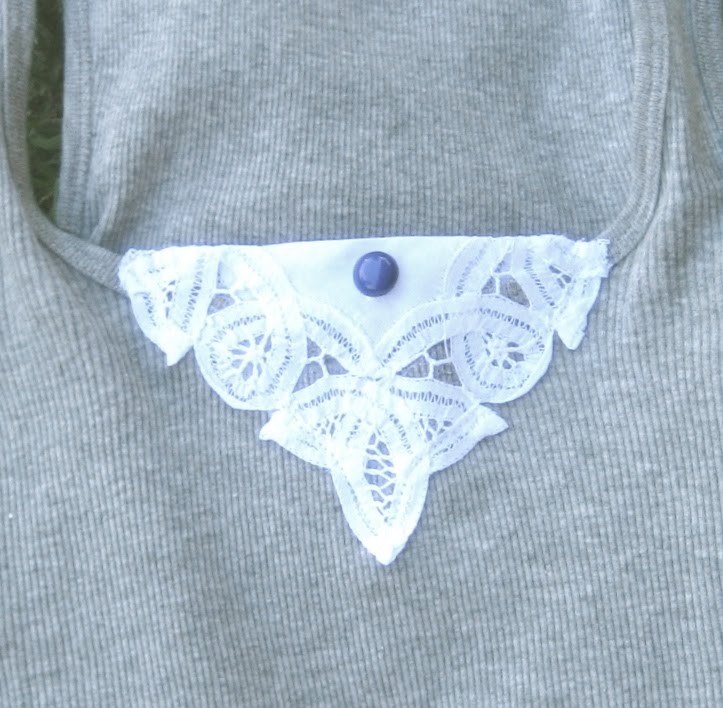
Add a little button or pin to the center...

...or just leave it as is!


And that's all there is to it!!!


Simple. Fancy. Lovely.


Did you try it?

Let me know in a comment or email. I'd love to see pictures and I might even show them off in a little post :)


Related Posts with Thumbnails