Showing posts with label Boys Clothing. Show all posts

Saturday, October 30, 2010

The tiny tool man tiny tutorial

It's no surprise that Jonah really loves playing with anything related to tools, trucks or construction.... the apple doesn't fall far from the tree as they say.
Our future tool man had his first birthday last week, and even though he may be a man of few words if he could, I just know he'd beg me to make him the best construction costume that any 1 year old has ever dreamed of.

So I did!

This is such a quickie that I thought I'd just share a mini "how to."

I sewed the vest, because it was actually quicker for me than to hot glue it since I was sitting in front of my machine when I thought to do this. However, for all those crafty non-sewers you could easily get the same result without a stitch!

What you need for the vest:
  • Three standard sheets (8" x 11") of orange felt
  • Scraps of black and yellow felt
  • Optional 2" strip of velcro to close the front (or just leave it open!)
  • Scissors
  • Sewing usuals (thread, needle, machine etc)
  • Or... hot glue and glue gun
Here's all I did:

Step 1: Cut out three main pieces for the vest
  1. The back- simply cut a shallow crescent (half circle) out of the middle of the top side of a full sheet of orange felt. This doesn't have to be perfect. Just cut a little dip and call it good.
  2. The front vest sides- use the back of the vest you just "cut" out to guide how wide the shoulders should be for the vest flaps. Mine ended up being about 2 1/2" wide. Start by marking 3" in from one side of a full orange felt sheet along the top. Do to the same about 5 1/2" in from the bottom on the same side. Those are you guidelines for one flap of the vest. Now, gradually trace from the top 3" mark downward at a diagonal to make one side of "v-neck." About halfway down the length of the sheet start dropping straight down. You can go back and slightly trim out a little curve from the starting side of the piece you just cut out to make it look like an arm hole. Do you see what I mean by the little curve on the outsides of the vest flaps in mine??
  3. The trim- Cut 1/2 to 1" wide strips of black felt the long enough to line the outsides of your vest. You can hot glue or sew these strips along the exposed edges of the vest. I didn't wrap it around like a binding. It's just decorative topping :)
  4. The side attachers- Cut two 2 1/2" x 5" strips to attach the front to the back.
  5. Optional yellow strips- Cut out 3 pieces long enough to go across each of the front flaps and back of the vest.
Step 2: Assemble the vest

Glue or sew the black trim to the edge of the vest. If you had to piece together the lining because the felt scraps weren't long enough, don't worry! It's black, it hides that kind of stuff nicely :) This is a good point to add any yellow accents you might want too.
Sew or glue the shoulders together before you fold the vest down and attach the side strips. The only trick here is to line 'er up real good.

Step 3: Add 2" velcro pieces to the front of the vest
This is optional, but I put little scraps of velcro I had on the front of the vest to keep it closed.

No velcro? No problem!

Felt will actually stick nicely to sand paper, if you have that laying around I happen to think it's very construction worker-esque to have something like sand paper glued to the front of your vest. Or just leave it open.


For the hat...
While I wish I were crafty enough to make a hard hat like this... I'm not. Or at least I don't have the time. I actually picked this up from the beloved dollar section at Target! I also spotted some hard hats at our Dollar Tree when I picked up his awesome pack of plastic tools to go with the new dress up digs.
The only snag was that the hat was waaay to big for both of my kidlet's wonderfully small heads. Small heads might sound like a bad thing, but not to the one who had to give birth to them! Anyway, my friend gave me the brilliant idea of gluing a piece of elastic across the middle to help secure it on!
Loved the idea almost as much as I love my friend!


Just in case I haven't convinced you that this construction outfit is ridiculous cute with my pictures...

I decided to risk letting you hear my awful camera voice just so you could join me in melting over this little guy's very new runway walk!

Who doesn't love seeing the toddling steps of new walker??

Monday, September 27, 2010

long sleeve rock star tee

We're not too high on the originality scale here, but with all the girly sewing I've been doing I figured it was only fair to throw in a quickie for the little guy too!


And, besides, who doesn't love a blondie with a tight guitar skirt on??


I roughly free-handed the guitar silhouette and left the edges raw, so they could curl up for a kind of rustic, old guitar tee shirt look....

maybe?

eh?

ooooh now you see where I was going...

gotcha!

I used one of my old stretchy tees from the Target clearance rack for the shirt sleeves and applique. Then I cut up a truly
Old Navy blue tank top that I couldn't even get over my shoulders anymore for the body.


I love the baseball tee spin on my basic pajama top pattern that made it look like an everyday long sleeve.

I made sure to cut the sleeves and the bottom of the shirt along the original tee-shirt hem, so I saved a step in the hemming process!

Turns out that moments after I dressed the model for his photo op his generous sister offered him a stashed away animal cookie from her pocket... and well, you can imagine how lovely the new shirt looked after his first nibble.

So you'll have just to imagine the mini guitar hero in his rockin' new shirt until it comes out of the wash...

Thursday, September 16, 2010

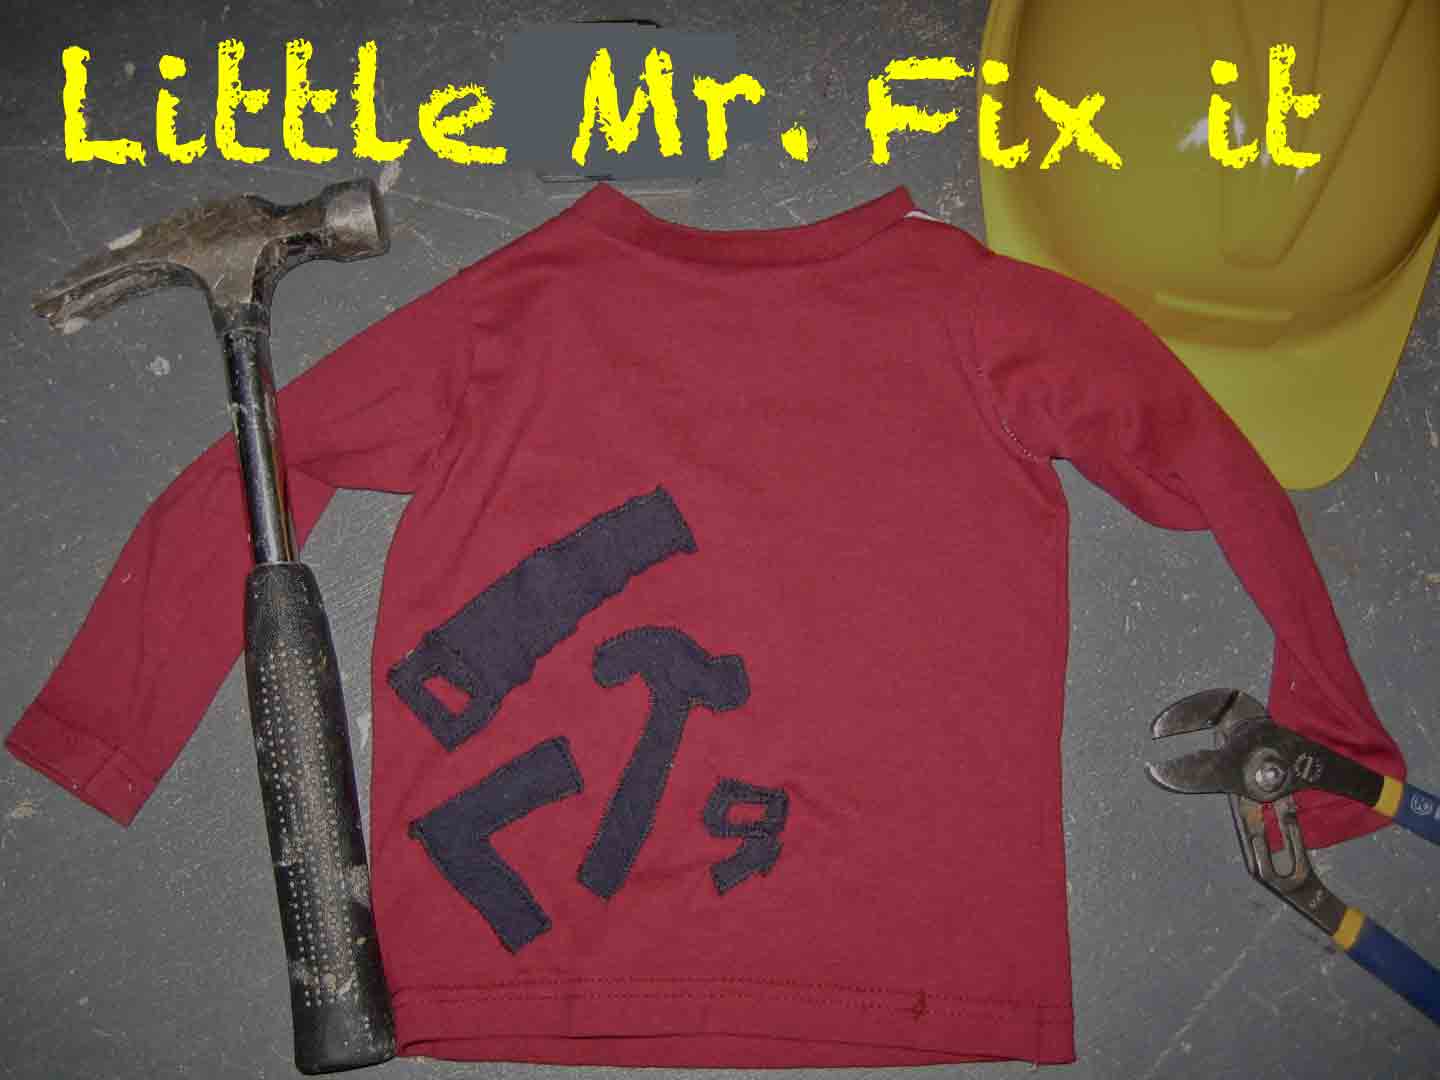
Little Mr. Fix It Long Sleeve Tee

If you can break it, you should learn to fix it!

That's right. It's a hard knock life in DIY land.

We start 'em young.

And to prove my point I er... made a long sleeve shirt with tools on it?

Ok, not you're buying it. I don't blame you.

But we do try to let the kids tinker a little with us while we're working on home improvement and craft projects. Jonah is a mean chewer of screw drivers and you should see Sienna sew a button! At 2 years old, I'm just really impressed she gets the needle through the hole. Needle! Yikes! Don't worry, she has a child's plastic one she plays with under close supervision by me while intensely absorbed in my own sewing nearby :)

Ok, ok, enough with the jokes. We're happy to admit that we're trying to force encourage our kids to get into on our hobbies too. And naturally, we get a huge kick out of dressing them for the part.

Hence the real motivation for the cute little long sleeve tool man t-shirt!

With a little saw, hammer, nut, bolt, and carpenter's square on it.

I used the same pattern and instructions for my new pajamas that you can check out here to make this long sleeve shirt out of an old t-shirt.
I made this one even easier by cutting out the existing neck from the old t-shirt to use as ribbing for the neckline instead of making my own.


Instead of ribbing for the sleeves and finishing the bottom of the shirt like I did for the pajamas I simply cut the pattern for the body and sleeves along the original t-shirt hemming.

Easy peasy!


I free handed the tools for the applique and sewed them onto the front of the shirt before sewing the sides together.
It's hard to tell in these pictures, but I straight stitched the saw blade a 1/4 away from the edge so it will fray slightly in the wash and look like a real blade!

I think the little tool man was so excited to get something made for him that he was more than willing to pose for a photo op.

He actually got quite into it.


Should I stand like this? With the one leg out?


How about if I turn slightly like this?


Hand up with a slight smile gazing past you in the distance??

No, no, that's too much.

How about this?

Wait, is that a bug over there?!!

Can we be done now?

He did good. It's hard to bribe a 10 month old for very long....


Tuesday, July 6, 2010

Sweet land of liberty

Of thee I sing!

...and of Liberty Matching Outfits of course!!

His and Hers


half as much as Sienna loves the gathered front pockets


Or as much as Jonah loved chasing the little bugs in grass

or even just yanking it out


Then there is no way you won't just devour this little stud in his Mr. Liberty Overalls

Even if he was too cranky to really smile from that 2nd tooth cutting in last night! Note the drooly chin. It can be so painful to be a baby sometimes!

We had a wonderful Independence Day and wish everyone would keep singing those beautiful patriotic songs all year long!!

God Bless America!

Tuesday, June 29, 2010

Mr. Liberty Overalls

The one thing I will always remember from my own mother is to always be fair

And what would be fair about not making a matching 4th of July outfit for Jonah too???


Clearly, I had no choice.

I just had to do it, and now that I'm done I am so glad I did!!


Maybe it's because I'm still star struck by the cute little buttons and the triple lined pocket...


Or maybe it's because I'm so proud of myself for being brave enough to figure out the snapped closure bottom (which was actually so much easier than I thought!) concealed with big boy cuffed legs (so cute!)

Or more likely, it's because I absolutely love little boys in overalls, but let me tell you that I was NOT glad I was doing this for about 2/3rds of the time I was doing it....

Let's just say that Mr. S. Ripper has taken up residence under my pillow.

This was my first attempt at overalls, and of course, I was making my own pattern. I thought I could figure out how to use an old pair in a size too small and upsize the pattern. I'm sure you won't be surprised when I tell you that my first (yes, there were 2 full overalls made) were

TOO SMALL!!

Grrr!


I almost cried. A lot.

But, like I said, fair is fair in mommy-ing and if Sienna got a new sundress then Jonah deserves a matching outfit too...

Plus, I just couldn't let all the seersucker fabric and special buttons go to waste!

and

more importantly...

I just had to get this one, because I simply can't get enough of the overalls on my little guy.

So I buckled up, threw in some bribery popsicles and went at it full steam yesterday and today.


....and VOILA!

I finally did it just in time for the 4th of July celebrations :)


There are 2 unfortunatelys however...

1) Mr. Liberty is not available to model at the moment, so you'll just have to wait until the big day (4th of July) to drool over how cute he looks in them.

and

2) Due to the multiple attempts at this one and relatively short window of time I had, there will not be a tutorial yet... but if I get enough comments (hint, hint** wink, wink**) I might be persuaded to make another pair and a tutorial to go with it! After all, I have had my fair share of practice while making these puppies!
And I promise, I know the easy way now :)

What do you think?

Wednesday, May 19, 2010

For Your Little Angel

You can't help but love newborn babies. There is simply something so blissfully angelic and pure about them that you can almost see the little guardian angel wings covering their backs.

But just in case you need a little help...

I just had to make one for our friends' newest babies this Little Angel Wing tee for his baptism this weekend!(Don't worry, just a teensy little break from my no-new-projects rule that it hardly count! Plus, I've been working so diligently on big project that I figured I deserved a break).


I thought I'd spice it up with a little extra cross on the front too. Kind of reminds me of the Lacrosse Alligator or something :)

I couldn't decide on blue bow or no bow. Suggestions?

Mr. Subtle Tee said no bow but it's hard to take his opinion seriously, because he was impatiently waiting for me to finish so we could leave for a party... whether he said no bow, because it was better or because he wanted me to hurry is a tough call. I left it off this time, but I think it could've been a nice touch. Maybe I'll do it for a girl's one instead.

Any other good ideas for baptism gifts??


Thursday, May 6, 2010

I heart MOM

And what better way to show the world than "tattooed" on one of the cutest bottoms I know!?


6 months ago I had absolutely no idea just how madly in love I'd be with this little snugglebug! Maybe it's something between mothers and their sons, but he just always seems to know just what I need to brighten my day.

On the very day of my birthday this year he giggled for the very first time and doesn't want to stop ever since!

For Mother's day this week he said "Mama" for the first time!!
(the jury is out on whether he knows I'm Mama, but he sure says it loud and clear when he wants to be held...)
Does it count?? IF not, let's just pretend it does until Mother's day is over : )

He is ALWAYS, and I mean always up for a good bear hug.


So it just seemed natural that I'd lend him a helping hand in making me what I really wanted from him for his first Mother's Day--- A cute Mom Tattoo Applique that I've been waiting to make him since we heard the words It's-A-Boy!
HAPPY MOTHER'S DAY to all!


There's still time to enter in my Pamper Your Way Into Spring Giveaway! Click here for more details.

Friday, April 9, 2010

Those booties have his name written all over them!

Ok, maybe just his initials


I'm so excited about this tutorial I found for little baby booties that I did the only natural thing there was to do- I dropped everything and ran to my sewing machine!

You wouldn't believe me if I told you how quick and easy these little guys are to sew. We're talking under 2 hours tops! With each trace and snip I couldn't help but dream of all the adorable fabric that I would love to buy to make more of these. I almost didn't post this, because I just know some of my preggers are going to die when they see these and wouldn't it be so much cuter to surprise them with it as a shower gift?? Maybe they'll just act surprised :)


I only used what I had on hand for this project... a few fabric scraps from the Easter outfits, wool felt for the sole, about 18 in of 1/4 in elastic and a little time. All Mommies know the last one isn't easy to come by and this week it wasn't something I was really suppose to have. All this in consideration, it's only fair to take a moment to thank my little helpers for making this possible.

First and foremost, my little Sienna for doing my chores for me while I sewed instead.


And second, the little sailor who sat patiently waiting for his new digs.
Related Posts with Thumbnails