Showing posts with label Cushions. Show all posts

Wednesday, January 5, 2011

Wrist cuff pin cushion love is in the air

Who doesn't love a homemade gift??


Not many people I'm learning after my first year of this crafty mommy blogger thing and I felt like the pressure was on just a tad bit this Christmas to dish out some personalized presents for a few a lot of those homemade gift lovers in my life.

Yikes!!

Luckily, there are some very creative, crafty bloggers out there who have the same brilliant ideas that I do with frequently much easier ways to make them!

I had the idea to make wearable pin cushions for some of my crafting partners in crime over here and just knew that I'd stumble upon the perfect, quick and easy tutorial if I just keyed in the right words...


And voila!

Before I could say the words I stumbled upon a tutorial for these adorable wrist cuff pin cushions over at Keyka Lou!

I had everything I needed at home to make these.... a little velcro, small amount of coordinating fabric, string and a big button. I even recycled a plastic baby food lid to put under the flower to block my wrists from those pesky long pins...

It was so quick, easy and inexpensive that I decided to go splurge on some fancy iron-over pins to match the fabric!!!

I'm so glad I did, because wasn't that just the right finishing touch for a little gift!?

Tuesday, June 1, 2010

Cushions over easy

I learned that there are 2 ways to cook an egg in the world of patio cushioning...

Over Easy


and over and over and over again the Hard Way

Turns out that what I considered my best shot at doing it like the "professionals," you know sewing on fancy snaps to neatly close the cover over the existing cushion, was really me sewing my patio cushions the hard way that no one does anymore. Most certainly not the "professionals."

My dose of humble pie came while standing in line at a wholesale fabric store trying to entertain my fellow line loungers with a
slightly over-dramatized story describing the pains of patio cushion sewing.

Do you ever do that? Pretend to be slightly more bothered by something just to fit in with the rest of the complainers?

I thought the endless time I spent meticulously lining up my snaps to make a tight closure was par for the course... I honestly didn't mind the painstaking process of sewing my cushions at that point (mostly because I didn't know any better), but everyone else in line seemed to be frustrated with part of their projects and that's all I had to relate with,
so understandably (right?), I acted upset too.

It turns out I must have been totally outing myself as the annoying sister trying too hard to fit in with the more experienced and undoubtedly cooler older sister and her friends, as minutes into my over-exaggerated rant a little old lady turns to me from the line over and said,

"Are you talking about
just sewing patio cushion covers, Hun?"

just sewing...

Hun...

Uh oh, two clear verbal signs that's I'm about to be informed of something apparently everybody knows... except me.


Wouldn't you know it... this woman was, by actual profession, a tailor and seamstress. Her number one profit maker and highest turn over item were custom ordered patio cushions. Go figure. I should consider my surroundings in a WHOLESALE fabric store before deciding how to best "relate" to the other shoppers.

I swallowed my pride and asked her how long it took her to do each cushion.

1 hour.

1 HOUR!

I almost hired her on the spot. She must have been a little sister at some poin
t, which apparently endeared me to her and my naivety in the sewing world. She immediately slipped out of her place just to stand next to me and give me a bunch of tips on how to cut corners (literally). What a sweet heart! I think of her as my guardian angel of sewing, swooping in to save me from further embarrassment and time wasting.

Do you want to know her most secret tip??

Here it is...

DENTAL FLOSS!!


I have tons of that lying around! Not only was it easier than the heavy weight, outdoor fabric thread it was free.

Instead of going through all the trouble matching up all the corners perfectly, hemming and aligning all the edges, she told me that all you really need to do is slip stitch the final edge with
dental floss. Can you believe it?

And honestly, the
Over Easy (with dental floss) actually does look more professional than my fancy schmancy removable cushion covers. Plus, she so cleverly pointed out that the floss covers were removable since it was so inexpensive and quick to sew them back up if you needed to.

The other perk- since you really can't see the floss stitching unless you intentionally pull back the flap (like I did in this picture), it doesn't matter how neat you are as long as it's sewn tight!

Clearly, I'm no pro and did not get down to 1 hour,
but by the last cushion I was impressively close to that 1 1/2 hour mark...


Many thanks to the quiet old lady, who in so many was saved me by whispering hush.

Sunday, May 23, 2010

My Patio Furniture Conquest!

It's been a few months in the making, but thanks to you all for that last uphill push to help me conquer my HUGE patio project just in the nick of time!

A few months ago we became the excited owners of new patio furniture!
New to us that is.

By new to us, of course we really mean something like this...

john cenaClick on the image for more before-pics


The price was right for this abandoned beauty, as you can imagine, and naturally, we had a vision to go with it.

A vision that started with a lot of this...


to cover all of this.


And a long and tedious revitalization for 12 of these...

...topped with the all important re-fashioning including custom-made (and quite elegant) red "robes."


After many, many late nights, more movie bribes than I care to admit, and (quite literally on all accounts) a lot of blood, sweat, and tears I conquered the biggest up-cycling project I've ever faced.


Are you ready to see it yet??

Ok....


Here! It! Is!


Sienna, of course, was the first to test it out.

I think she was as excited as we were :)


But the best test came after naptime...

when Mommy and Daddy finally had the perfect spot to celebrate their hard work with some nice, fresh and fruity margaritas!

A job well done and just in time to help us enjoy my baby brother's graduation as we welcomed nearly my entire extended family to our completed patio for 3 days of non-stop pool side delight!!

Thanks for such a wonderful time (all of you who are reading this)
and to my little brother- I'm so proud of you!!


It's been a great week to say the least, but I've missed my bloggy blog world and I'm excited to dive back in. I guess the best part about a break is all the great ideas that seem to just pop in your head without even trying... let's just say I have some work to do!!

Saturday, May 15, 2010

Painless Piping

Don't believe me? Here's how I taught myself in only a few tries....

I'm conquering so many firsts for myself in my huge Patio Project and I promise to share all the tips and tricks I'm picking up along the way! The first stop was tackling this whole business of piped cording.


It's one of those
musts for upholstery and really completes the professional look for lots of pillows, purses and even some clothing.


Like this really cute nautical top from Anthropologie....

Or these crisp cushions from Pottery Barn....

I don't know what's up with the navy and white theme, but these were the two examples that caught my eye :)


Here's what you'll need
  • Fabric for your piping cut into bias strips
  • Material to sew it on :)
  • Cording to go inside your piping
  • A zipper foot for your sewing machine
  • A denim needle size 100/16 for sewing through heavy fabric with lots of layers
  • Ruler, pins, fabric marker and your trusty iron
Don't worry, I'll walk you through all this stuff!

Cording
3 types to choose from
  1. Store bought cord with 1/2" fabric edge
  2. Store bought cord without any fabric edge
  3. Custom made cord that you make by wrapping fabric around plain or welting cording and stitching leaving a 1/2" fabric edge.
The quickest type of cord to work with is the cord with a fabric edge, as this kind of cord comes ready to go for you to just sew the cord right along a seam. The problem there is you are limited by the colors and styles you can choose from. That's why for this project I used custom made cording, so that it could match my cushions exactly!

The BIAS STRIP

Don't be embarrassed if you're not really sure what a bias strip is, because I wasn't either! I see them in the store all the time and it looks just like a bunch of thinly cut fabric strips.

And that is basically it with a few secrets behind the cut. A bias strip is a thin strip of fabric that is cut on the bias (or diagonal line) used to finish edges or in this case, wrap around the cording to making bendable and smooth piping. They do sell a number of pre-made ones in the fabric store, but I just think it's much more fun to pick your own matching fabric and make some yourself.

Hold on! Don't run off to the cutting board just yet. Before your start nipping away at your really, really long strips of fabric let me tell you about this much easier, cheaper and once you get the hang of it, quicker way to cut your own bias strips out of a small square of material!

Personally, I am simply amazed at how this works out. Click here for a tutorial on cutting your own bias strips.


OK. Finally! Let's get started....
Step 1. Cut your bias strips to your desired length and width. In this case, I need to cover big cushions, so my strips were 69" long and 1 1/2 " wide.

Step 2. Cut your welt cording 1 in shorter than bias strip. 68" in this example.

Step 3. Fold your bias strip in half and iron to form a nice crease. Open your strip back up and tuck the cord right in the crease. Pin in place.

Step 4. Crease the fabric you want to sew your piping to along the seam.


Step 5. Open the fold and lay the piping on top so that the raw edges of each piece are on the outside and the piped corded rests onto of the fabric. So the finished product will look like the picture to the left.


Step 6. Attach the denim needle and the zipper foot on your machine. Begin sewing the wrapped cord to your fabric about 1" from the end, so you'll save room to attach it or close it when you're finished. Make sure you get the piping as close to the zipper food as possible.


I actually prefer to sew this with the piping strip on the bottom and the fabric piece on top. I find it's easier this way, because I can feel for the cording beneath the fabric with one finger, while using the ironed crease as my guide for exactly where I want the piping to go as in straight (which is harder than you think with so many layers of fabric!)


Step 7. Finish sewing, make a little hem at the end, flip over and admire your hard work!


Here's a little preview of the piping on one of my patio cushions chairs in progress....


There are different ways to finish the piping if you want continuous piping or piping that does not end, as in the edge of a pillow. While I didn't use continuous piping for this project, the easiest way that I read about basically tucked the beginning of the piping inside the casing of the end of the piping.

It looks like all you do for this is simply sew the piping to the main fabric stopping about a half inch before where you started and trim the end of the piping back to give enough fabric to turn under and enclose the beginning of the piping. The ends of the piping should but up to each other under the fabric. Then all you'd do is fold under the fabric to enclose the beginning of the piping and sew in place.

Sounds pretty easy. I'll have to try this when I get to the decorative pillows for the patio set, so if you've done this before I'd love to hear any tips or tricks :)

Bias strips made easy!

This tutorial is how I learned to toss out the crumpled corner

And proudly welcome THIS delicious smoothness!

The only thing I changed was the way I cut my bias strips :)


Is it just me or does anybody wish that sewing books and patterns were written in plain English?? I have to admit that I still feel as confused as a mole in broad daylight when I try to teach myself new stuff, so I often glance over things that seem easy enough to figure out...


Let me tell you about my most recent adventure with bias strips and how I learned (again) why it's important to read the directions first, so that after you are almost finished with your entire cushion you don't end up having to scrap it, because Mr. Crumple Corner just wouldn't go away...

It all comes down to one tiny over sight. The Bias Strip. These were one of those lovely things that made me feel as sharp as a circle when I thought I was the only sewer smart enough to skip the hubbub and just cut really longs strips. Let me tell you, there is a reason most "sewers" don't just do that!!

A bias strip is a thin strip of fabric that is cut on the bias (or diagonal line) used to finish edges or in my case, to wrap around cording to make piping for my patio cushions.

The "bias" was the key that I was missing in my own looooong strips of fabric you see. The reason quilters and other sewers use bias strips is that they're cut along the material that has the most stretchability so that it easily bends smoothly around corners like this:

Funny how I thought I was taking the easy way out before, because once I learned this way to make them I couldn't believe how quick and easy it was!! And what a difference!

Here's how I did it:


Step 1. Cut a square piece of fabric. In this case I used 21 x 21 inches.


Step 2. Fold the corners together to make a big triangle, make sure the edges match up perfectly (cut any excess fabric if you need to), and finally cut along the folded line to make two smaller triangles.


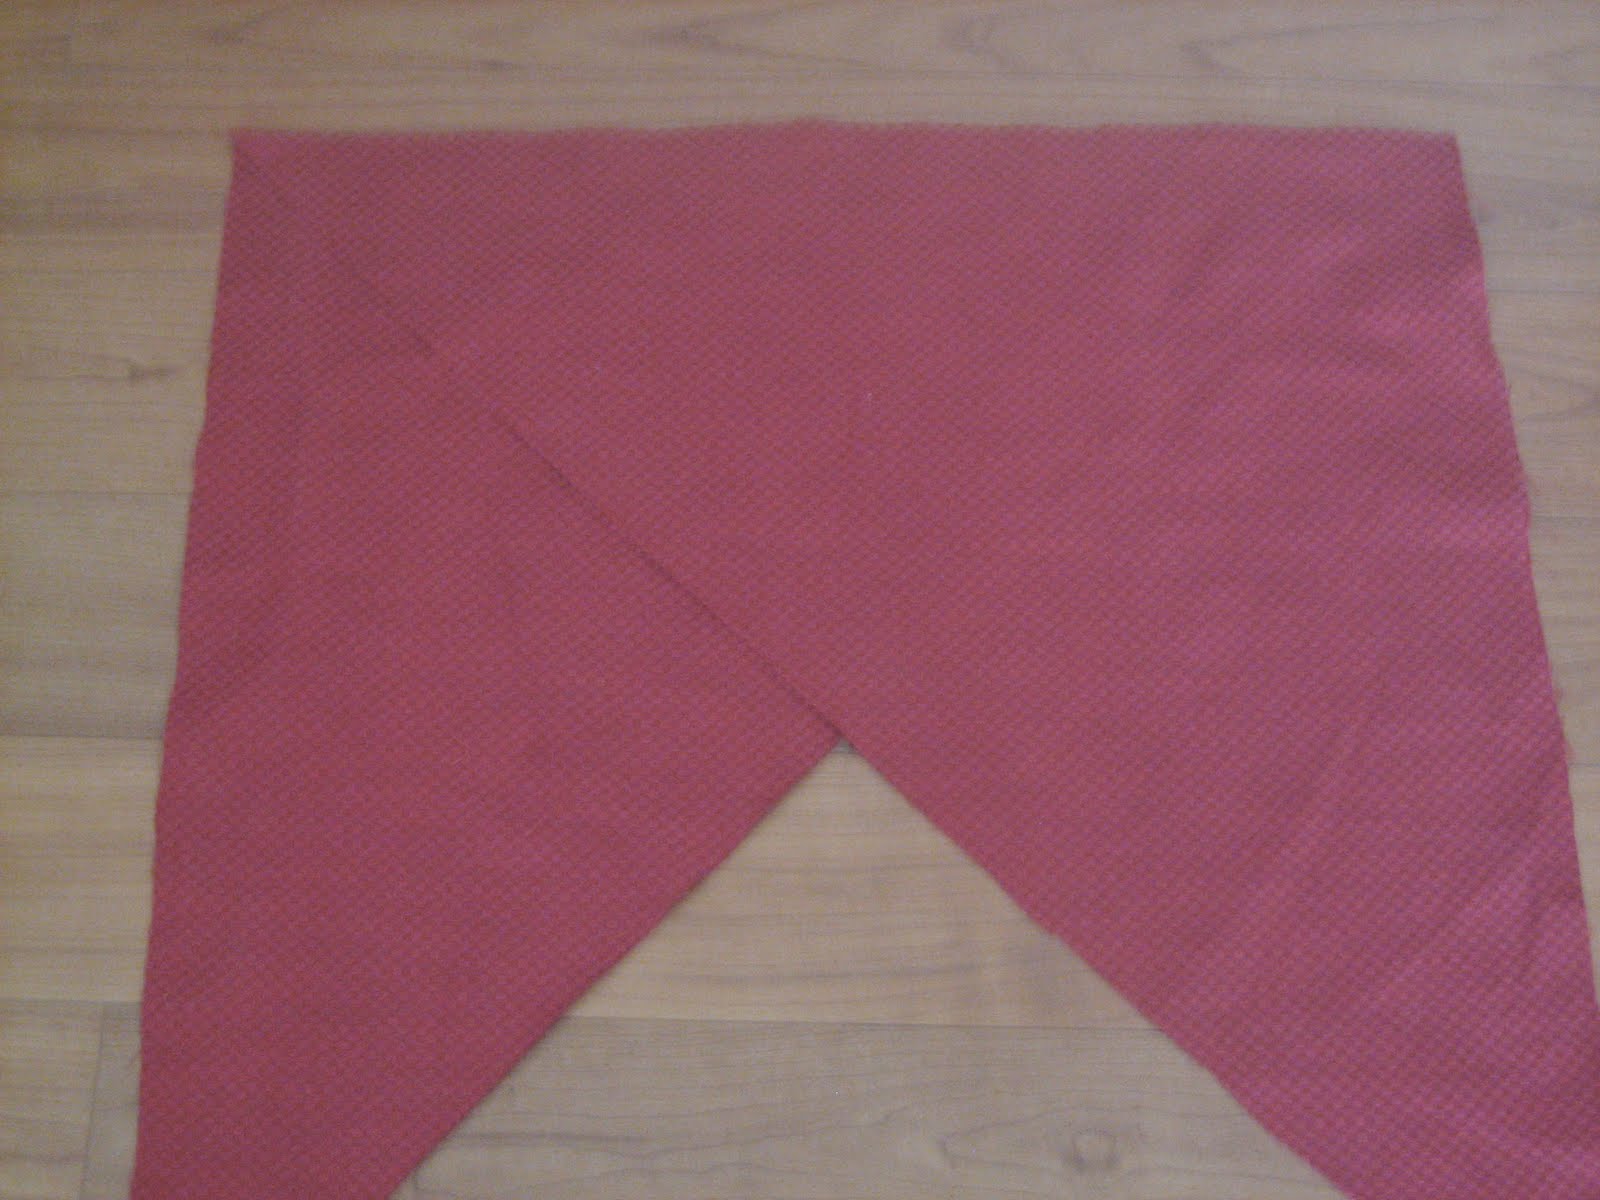
Step 3. Lay the two triangles together so the tip of each hypotenuse (diagonal line) touches the right angle corner of the other triangle. Like so:

Step 4. Pin and sew a 1/4" seam to attach the two triangles along this edge. Unfold and press your seam open. This is very important so your bias strip wraps or folds smoothly.

Step 5. Using your ruler and fabric marker (or chalk like I do) mark a line across the width of your parallelogram about 1 1/2" apart. You can adjust this for smaller or wider bias strips. Starting with my 21 x 21 inch square I was able to draw 9 lines.

Step 6. After all of the lines are drawn, wrap the parallelogram around to match up the lines from the opposite side skipping the first mark. Again, it is very important to skip the first mark so that a continuous strip can be cut.


Step 7. Almost done! Pin the tube together and sew another 1/4" seam. Make sure to press the seam open as well.


Step 8. Last, but not least, simply cut along the marked lines so that you create one very long strip.

If you're using the bias strip for piping, all you'll need to do is fold it in half once and press to create a pocket for the cording.

If you're creating decorative trim for a quilt or another garment you can hide the raw edges by first pressing a small seam on each side and then folding in half to crease.

And that's all she wrote! Finally :)
Related Posts with Thumbnails