Saturday, July 10, 2010

A Totally Turtle Tutorial

A turtle pincushion that is :)

Would you believe it if I told you that until now I didn't have a pincushion?? Could you imagine sewing without one?

I couldn't any longer...

Soooo... I dreamed up this little swimmer last night and it only took me an hour to stitch him to life during naps today.


It's so easy I feel silly for making a tutorial, but you know, sometimes it's just nice to have things laid out, so you don't have to think about anything. Hopefully this will be helpful :)

Here's all you need:
  • Felt, canvus, wool, burlap or some sort of heavier weight material for the outside
  • Needle, thread, sewing essentials (you can use a machine or easily hand stitch this one)
  • Mircofilling or just scraps of fabric, whatever you have laying around
  • An hour or less!
Ready??

Step 1
Trace and cut out a "fat" oval onto your felt or heavy fabric


Step 2
Use the first oval to trace an cut out a second over slightly bigger than the first. I made mine about a 1/4 inch bigger all the way around.


Step 3
Draw and cut out 2 little arms, 2 legs, 2 circles the same size for the head and a tail.


Step 4
Use a button or small circle to cut 15 or so circles or square or whatever shapes you like to decorate your turtle shell.


Step 5
Sew the circles onto the larger of the two ovals.


Or... since you won't be washing this
(shhhhh don't tell anyone I'm going to say this, but...)


just glue those puppies on there!


Step 6
Sew the two head circles together and stuff with scrap pieces of fabric or stuffing. Attach the arms, legs, tail and head to the smaller of the ovals. I say "attach" because you could sew or glue :)

Step 6.5 (optional)
To throw in a little extra flair, sew a gathering stitch around the larger of the ovals to make a slight ruffle on the top shell.

Step 7
Starting at the tail of the smaller oval (which will be the bottom) sew on the larger oval (shell) going in one direction and stopping at the head. Stop. Go back to the tail and sew in the opposite direction, so that the opening you leave for stuffing is at the head.


A little tip- Use chop sticks to poke the stuffing all the way to the back.

Step 8
Hand stitch the rest of the shell closed around the head.


He loves his new home!

And Sienna loooooves him...

Why do I have the feeling I'll be making stuffed turtle dolls soon??

Friday, July 9, 2010

It smashes...

A few days after discovering this we got home from a playdate to find this:

Earthquake?


No....


Just Daddy making a mess, so he can fix it


And very lucky for Mommy, he does a pretty incredible job of cleaning up that mess...


Because taking out wall insulation can be a really big one that you just don't want to stumble upon with curious toddlers in the house...


Sienna is so excited that Daddy is building a new "showller" for her!

And so is Mommy, but she really wishes Sienna could remember to go to Mommy's bathroom right away when she has to go pee pee and poo poo since her potty is currently on the side of the house and the distance from where her former potty was to Mommy's potty is a loooooong way in land of

"WAIT! You're potty is not there right now! Don't-go-yet!"


Deconstruction of a recently potty trained 2 1/2 year old's bathroom was not the best timing....!!


Wednesday, July 7, 2010

It starts...

The other day I came home to this smack dab in the middle of our hall

(blockading my sewing room... coincidence? I think not!)


Sienna and I decided it could only mean one thing...

"Daddy's planting flowers in Jonah's bathtub?"


No....


"Uh oh Momma!! Look! Daddy breaking Sienna's show'll'er"


Well, she was sort of right about the second one!


Deconstruction on bathroom #2 is officially underway...


Tuesday, July 6, 2010

Sweet land of liberty

Of thee I sing!

...and of Liberty Matching Outfits of course!!

His and Hers


half as much as Sienna loves the gathered front pockets


Or as much as Jonah loved chasing the little bugs in grass

or even just yanking it out


Then there is no way you won't just devour this little stud in his Mr. Liberty Overalls

Even if he was too cranky to really smile from that 2nd tooth cutting in last night! Note the drooly chin. It can be so painful to be a baby sometimes!

We had a wonderful Independence Day and wish everyone would keep singing those beautiful patriotic songs all year long!!

God Bless America!

Friday, July 2, 2010

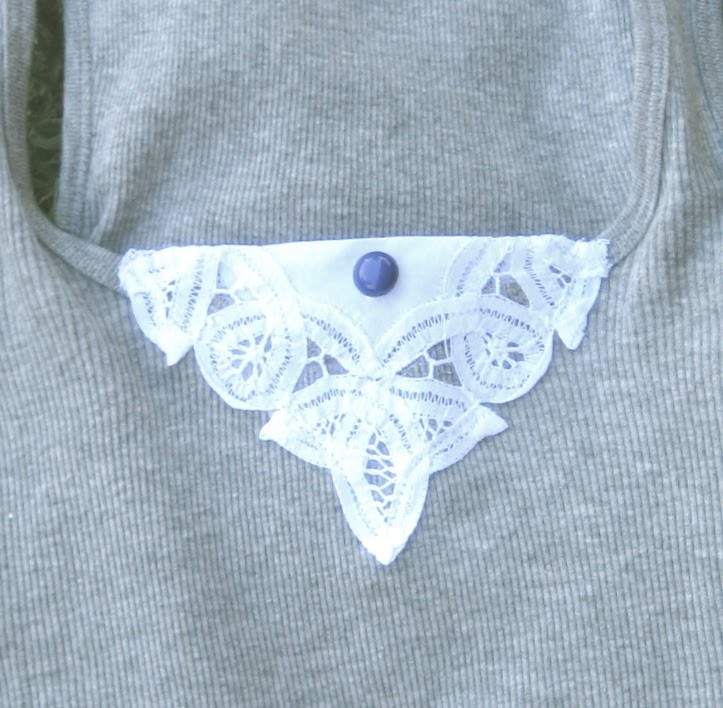
No-Sew 10 min Doily Top tutorial!


A tank top refashion in less than 10 minutes
that doesn't involve any sewing at all???

Of course!


It's so quick and easy, how could you not?


(Happy birthday to my beautiful sister!! Isn't she so cute?!)

This fancy little tank remodel makes the perfect homemade gift and takes just 10 minutes. But that's not even the best part of all, it's almost mess free to make and simple enough that Sienna helped me make the entire thing for her Aunt Dani's birthday present!

Here's what you need:
  • Any tank top new or old
  • Any shaped doily (I got this one from my grandma's junk drawer, but they sell them at the Dollar Store for well... $1)
  • An iron
  • Optional button or pin for the center
  • TOP SECRET NO-SEW AGENT- Magic poly web adhesive!! (I used the left over scraps from my Ikea curtains, but they sell this wonderful stuff at any Michaels, Walmart etc for a few bucks. Did I mention it's wonderful?)


Step 1
Press the doily in half so that it's nice and flat


Step 2
Fold the doily over the front of the tank so that one half of the doily is in the front and the other in the back.


Step 3
Carefully clip off any extra edges that don't lay flat on the neckline.


This might not be necessary, but depending on the type of doily you used you can dab a little Fray Blocker on the edges that you cut to prevent fraying. I didn't have to with mine, because I was able to clip along the string.


Step 4
Cut strips of the poly web adhesive to the length of the doily and carefully place between the doily and tank top.
Use one for each side on the front and back.


Depending on the shape of the doily, you can also add small pieces to the center and bottom.
A little of this stuff goes a long way.


Step 5
Set the adhesive by applying direct heat with an iron for a few seconds.

Don't forget to repeat for the inside of the tank top too.

Step 6
Add a little button or pin to the center...

...or just leave it as is!


And that's all there is to it!!!


Simple. Fancy. Lovely.


Did you try it?

Let me know in a comment or email. I'd love to see pictures and I might even show them off in a little post :)


Related Posts with Thumbnails