

Oh my seasons, fall is in the air!
...ok maybe not quite in Phoenix, but certainly in all the stores and in most normal places around the country....
Regardless, since we plan to visit may of these wonderfully cooler climates in a few weeks I think we better be prepared. And by prepared, I mean... make sure we have ridiculously cute and cozy new pjs to lounge around in at Grandma and Grandpa's house!
 make sure we have ridiculously cute and cozy new pjs to lounge around in at Grandma and Grandpa's house!
  And in the meantime to just pretend to wear over here...
  Or to simply snuggle and giggle with...
Either way, for that smile I think I'll take it!
This is my first long sleeve top (eck! did I just admit that?!), but it was not nearly as scary as I thought. I used less than 2 yards of fabric, some old hand-me-down boys pjs as a pattern and just over 2 hours, that's it!
Wanna try??
Here's what you need:
- About 1 1/2 to 2 yards of knit or stretchy fabric depending on the size pjs
- 1 yard of 1' wide ribbing
- Old pjs to use as a pattern
- Sewing machine, thread, pins, iron etc
- 2-3 hours depending on you
Here's all you do:
Step 1: Make your pattern
Front of the Top
Fold your fabric in half to begin. Fold the old pj top in half and lay the fold you made in the shirt along the fold of the fabric. Fold the arms out of the way along their curved seam as best as possible. Using a piece of chalk, trace the outline of the shirt about 1/2 inches away to give yourself a little seam allowance to work with.
 When you get to the neckline, leave some extra wiggle room at the shoulder and lift up the neck slightly to trace just short of the edge of the ribbing.
 Like so...

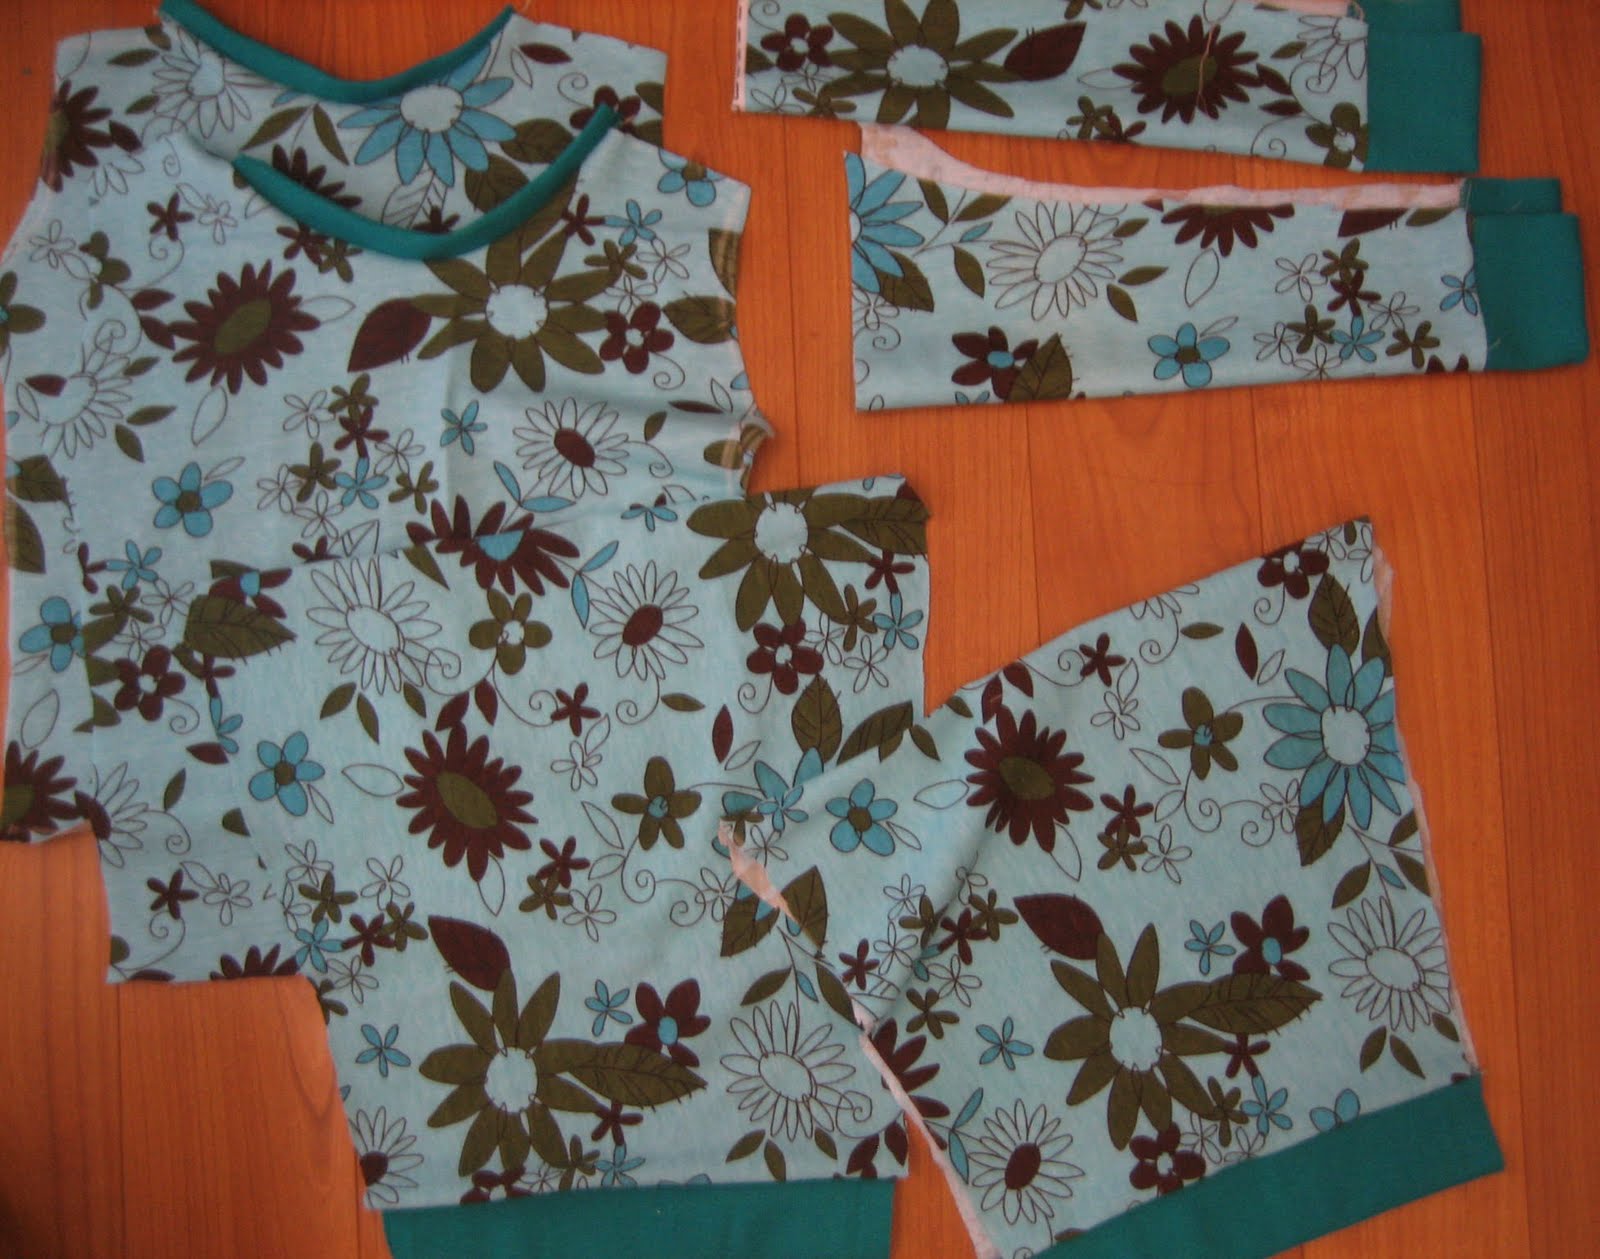
Back of the top
I like to flip the shirt around just above where I traced the front, so that both sides line up at the neck and arm holes. This way I get a better idea of how they're matching up.

Sleeves
Lay the sleeves flat along the fold of the fabric so that top of the sleeve (part without a seam) is against the fabric fold. Trace about 1/2 inch away from the bottom and end of the old sleeve with chalk stopping just beyond the beginning of the ribbing. No need to give seam allowance at the top of the sleeve since you don't need to sew it.

Pants
Fold the old pants in half and lay the outside of the old pjs along the fold of the fabric.Front of the Top
Fold your fabric in half to begin. Fold the old pj top in half and lay the fold you made in the shirt along the fold of the fabric. Fold the arms out of the way along their curved seam as best as possible. Using a piece of chalk, trace the outline of the shirt about 1/2 inches away to give yourself a little seam allowance to work with.
 When you get to the neckline, leave some extra wiggle room at the shoulder and lift up the neck slightly to trace just short of the edge of the ribbing.
 Like so...
Back of the top
I like to flip the shirt around just above where I traced the front, so that both sides line up at the neck and arm holes. This way I get a better idea of how they're matching up.

Sleeves
Lay the sleeves flat along the fold of the fabric so that top of the sleeve (part without a seam) is against the fabric fold. Trace about 1/2 inch away from the bottom and end of the old sleeve with chalk stopping just beyond the beginning of the ribbing. No need to give seam allowance at the top of the sleeve since you don't need to sew it.

Pants
 Using a piece of chalk trace along the edges of the pants leaving about 1/2 in gap for seam allowance on all sides except the waist. About 3 inches before you get to the waist of the pants, start angling outward so that you end about 2 1/2 inches away from the top of the old pant's waistband. Next, you'll want to trace 2 1/2 inches up from the top of the old waistband to leave enough room to make a casing for a new one.
Since we're not using exact science here, I like to cut out the first pant leg first and then use that as a template to trace the other half of the pants.
 The nice thing about that is you can just cut right along and save yourself the chalking!
Step 2: Measure and cut the ribbing
Unfold the sleeves and pant legs you cut and lay them on top of a strip of folded ribbing.
 Mark the width of ribbing you'll need and cut strips for the end of both sleeves and pants.
Repeat for the neckline of the front and back of the shirt. The neck ribbing will lay flat if you cut it slightly shorter than you actually need. Don't ask me how this works, it just does.
 Then once you pin your slightly short neck ribbing strip you can stretch it to match the ends of the shirt like shown above.
Step 3: Sewn the ribbing to all your pieces
You can use a serger or a zigzag stitch on your sewing machine to avoid the raw edges as you attach the pieces of ribbing to each part of the pjs.
 Iron all of the seams open like so...
Step 4: Sew the pants together
Lay the pant legs flat with same sides together, so it looks kind of like a diamond. Sew each of the top sides of the "diamond" from the unribbed end of the pants down to the crotch. Open the pants so the seams are on the front and back and of the pants.
Sew the pant legs and crotch together. I like to do this by starting at the foot of the leg and sewing up toward the crotch and straight across to the foot of the other leg.

Step 5: Sew the elastic onto the pants
You can fold down the top of the pants to make a casing for an elastic waistband, or simply use a wider band and leave it visible like this...

To do that all I did was match the edge of the elastic band to the edge of my pants. Since the fabric will be wider than your elastic you need to pin the elastic in sections starting with 4 big sections and working your way down like I showed in my 20 minute skirt tutorial.
 Serger or zigzag stitch the elastic to the pants and you're already done with the waist!
Step 6: Sew the top together
Start by sewing shoulders together. Nothings special, just match up and go!

Next, line up the sides of shirt and stitch or serger together, stopping at the armpit.

Step 7: Sew and attach the sleeves
Sew the sleeves together inside out. Make sure the ribbing lines up at the end of the sleeve.

Turn the body of the top inside out. Poke the sleeve through the armhole with the sleeve right side out. I know this sounds backwards, but it works.

Begin carefully pinning the sleeve to the arm hole by matching up the seam lines on the bottom of the sleeve to the seam lines along the sides of the shirt.
 It should look like that.
Carefully fold right side out with the sleeves pin to make sure you've done it the right way. When you're all cleared go ahead and serge or sew it together. Repeat for the other side.
Step 8: Finish shirt bottom
To match my exposed elastic waist, I decided to finish the bottom of the shirt with a quick rolled hem, but if you left enough room you can fold and hem as normal too.

Woohoo!
You're already done!!
You're already done!!
Just because I couldn't resist her contagious excitement over fancy new pjs I caved when she begged to wear them to bed tonight.

I know, I know, I'm already planning on waking up and change her when she's too hot to sleep in the middle of the night....
Or we could turn our AC waaaay down low... hum, tempting considering that I'd sleep really well too, but then where would the money saved on sewing my own pjs be?
The things us mothers do to see our kids loving the clothes we make them!


Fabulous! I love the tutorial, very clear! Would you mind leaving some tips sometime (soon!) on the settings you put your serger on to work with knits? I'm a serger newbie and need a little extra help!
ReplyDeleteI'm gonna do this for my almost one year old as soon as I decifer my serger settings!!
I just did two similar PJs for my 2 year old. Except I do not have a serger, so I do all the seams with zig-zag and I sewed all the bindings first in rounds and then attached to finished sleeves/pants. Your ways is much easier, but I wonder how it would look without a serger. I do not insert the sleeves, but construct them flat and then sew the sleeve/side seams in one process - much simpler! Here is a picture on my blog - http://talyq.blogspot.com/2010/09/quick-ottobre-pajama.html - I did one more a bit bigger, but didn't take a photo of it yet.
ReplyDeleteGreat tutorial! I hope you'll stop by Thursday and link up to Make It Wear It at TheTrainToCrazy.com!
ReplyDeleteawesome tutorial! I need to make a bunch of these! thanks!
ReplyDeleteThanks everyone!! I'm glad the tutorial was useful. Nata, that is a great idea to just construct the sleeves flat and sew the sleeve and side seam in process. I'll have to try that with my next sleeves. Thanks :)
ReplyDeleteHi there, I am soooooooo inspired by your post, thanks for sharing. But I am always afraid to sew with knit fabric, I haven't got a serger machine, only ordinary sewing machine. Will the fabric not stretch if I use zig zag stitch to sew the knit fabric? Thanks so much for helping me.
ReplyDeleteYou are so brave. I am always nervous I'll mess up the fabric. I suppose you could use cotton to make a shirt set too. Husbands please watch our kids.
ReplyDeleteLove this! I'm linking to my blog today!
ReplyDeleteseemesew.blogspot.com
https://bayanlarsitesi.com/
ReplyDeleteGöktürk
Yenidoğan
Şemsipaşa
Çağlayan
CT6C
bitlis
ReplyDeletekastamonu
çorum
van
sakarya
X5SD
https://titandijital.com.tr/
ReplyDeletekars parça eşya taşıma
konya parça eşya taşıma
çankırı parça eşya taşıma
yalova parça eşya taşıma
HOQN
ankara parça eşya taşıma
ReplyDeletetakipçi satın al
antalya rent a car
antalya rent a car
ankara parça eşya taşıma
DMNF
Mersin Lojistik
ReplyDeleteAmasya Lojistik
Kayseri Lojistik
Kırklareli Lojistik
Erzurum Lojistik
LWG
23E58
ReplyDeleteKilis Parça Eşya Taşıma
Iğdır Parça Eşya Taşıma
Eskişehir Evden Eve Nakliyat
Mersin Evden Eve Nakliyat
Adana Lojistik
FAB25
ReplyDeleteDiyarbakır Lojistik
Samsun Şehir İçi Nakliyat
Dxy Coin Hangi Borsada
Mith Coin Hangi Borsada
Apenft Coin Hangi Borsada
Sivas Evden Eve Nakliyat
Btcst Coin Hangi Borsada
Iğdır Evden Eve Nakliyat
Silivri Çatı Ustası
7852F
ReplyDeletehttps://referanskodunedir.com.tr/
053746AFD3
ReplyDeleteTelegram Oyun Botları
En İyi Kripto Telegram Botları
Telegram Güvenilir Coin Botları
Telegram Para Kazanma Grupları
Binance Hesabı
80523FA12E
ReplyDeleteTelegram Coin Botları
Telegram Para Kazandıran Botlar
Telegram Madencilik Botları
Telegram Para Kazanma Grupları
Binance Hesabı