Monday, November 22, 2010

A quick winter dress for baby and me!

Pat-a-cake, pat-a-cake, bakers man

Make me a dress as fast as you can!

(pretty please, Momma?)

You gotta roll it, pat it, mark it with a "B"


And don't forget to make one for baby AND me!


YAY!!!!

Thanks Momma!

And how could I do anything less for that squeezably round little face?


But I'll tell you, when I sat down to make her pat-a-cake dress I was stuck. All I could think of was this adorable long sleeve peasant dress I saw at the Little Bean Workshop.

And then it hit me like a pie pan to the face. Isn't copying the highest form of flattery? And I DO love so many things on Amy's blog. And what better way to honor my personal #1 copycat than to copy this cute little dress that's stuck in my head anyway??

So I did.

In almost every single way down to the perfectly fitting argyle fabric that happened to be on sale at JoAnn's all week :)

It was so incredibly easy to make that I threw one together for baby too!

Then, to spice it up with my own little spin I put 2 teeny pockets on the front just the right size for those chilled winter hands to warm up in.

Thanks for the great tutorial from Little Bean Workshop!

Tuesday, November 9, 2010

Hard hats required for this birthday zone

Our little man had his first birthday a few weeks ago and I couldn't think of a more fitting party theme than this!


Our house quickly became construction central with dump trucks, building blocks, tools, dirt and lots of hungry boys hanging around.

Wait, that doesn't sound too different than normal!


Ok, a little different from normal... unlike our normal construction zones, this Birthday Zone was specially made for little diggers 3 and under!

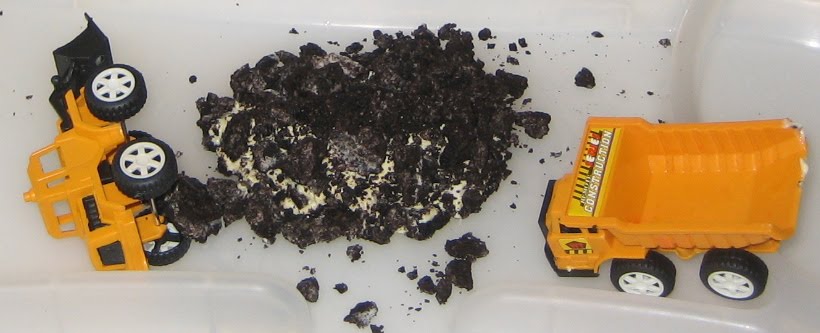
Even the birthday cake was a just like playing in the dirt!

Jonah blew out his first candles in the back of his dump truck filled with dirt cake!

Each kid even got their own mini trucks to dig around their cake with.

When we weren't covered in chocolatey dirt we were very busy constructing giant cardboard block towers.

Well... actually they weren't so gigantic after all.

It's no surprise really if Jonah thought it was this much fun knocking over little blocks
...


We could've expected our big block towers never to rise much taller than this...


The kids still had fun and loved helping Jonah break in his new favorite toy from Aunt Dani...


You didn't, did you?!

You DID!!

Our little boy has his very own, very manly, QUAD!


Adorable.


Here's the yummy, super manly (but could also be girlie with a slightly different angle)
Dirt Cake Recipe!

Ingredients
  • 1/2 cup butter, softened
  • 1 (8 ounce) package cream cheese, softened
  • 2 (3.5 ounce) packages instant french vanilla pudding mix
  • 3 1/2 cups milk
  • 1 (12 ounce) container frozen whipped topping, thawed
  • 1 package of chocolate oreo cookies with creme filling

Directions
  1. Smash, crumble or chop cookies into a small pieces. You can use a food processor or a meat mallet and a ziplock bag seem to do the trick :)
  2. Mix the softened butter, cream cheese, and sugar in bowl until smooth.
  3. In a separate large bowl mix milk and pudding. Incorporate as many of the pudding globs as possible before adding the whipped topping to the mixture.
  4. Combine pudding mixture and cream mixture together.
  5. Layer in a lined dump truck or flower pot starting with cookies then cream mixture. Repeat layers.
  6. Chill until ready to serve.
  7. Decorate with mini dump trucks, paper flowers, gummy worms, etc
Note: As with all cakes, they're not exactly easy on the diet, but the best secret I've discovered with this is that using fat free or low fat dairy ingredients doesn't really change the taste! I've been doing it for years and my husband has had no idea :)

Saturday, October 30, 2010

The tiny tool man tiny tutorial

It's no surprise that Jonah really loves playing with anything related to tools, trucks or construction.... the apple doesn't fall far from the tree as they say.
Our future tool man had his first birthday last week, and even though he may be a man of few words if he could, I just know he'd beg me to make him the best construction costume that any 1 year old has ever dreamed of.

So I did!

This is such a quickie that I thought I'd just share a mini "how to."

I sewed the vest, because it was actually quicker for me than to hot glue it since I was sitting in front of my machine when I thought to do this. However, for all those crafty non-sewers you could easily get the same result without a stitch!

What you need for the vest:
  • Three standard sheets (8" x 11") of orange felt
  • Scraps of black and yellow felt
  • Optional 2" strip of velcro to close the front (or just leave it open!)
  • Scissors
  • Sewing usuals (thread, needle, machine etc)
  • Or... hot glue and glue gun
Here's all I did:

Step 1: Cut out three main pieces for the vest
  1. The back- simply cut a shallow crescent (half circle) out of the middle of the top side of a full sheet of orange felt. This doesn't have to be perfect. Just cut a little dip and call it good.
  2. The front vest sides- use the back of the vest you just "cut" out to guide how wide the shoulders should be for the vest flaps. Mine ended up being about 2 1/2" wide. Start by marking 3" in from one side of a full orange felt sheet along the top. Do to the same about 5 1/2" in from the bottom on the same side. Those are you guidelines for one flap of the vest. Now, gradually trace from the top 3" mark downward at a diagonal to make one side of "v-neck." About halfway down the length of the sheet start dropping straight down. You can go back and slightly trim out a little curve from the starting side of the piece you just cut out to make it look like an arm hole. Do you see what I mean by the little curve on the outsides of the vest flaps in mine??
  3. The trim- Cut 1/2 to 1" wide strips of black felt the long enough to line the outsides of your vest. You can hot glue or sew these strips along the exposed edges of the vest. I didn't wrap it around like a binding. It's just decorative topping :)
  4. The side attachers- Cut two 2 1/2" x 5" strips to attach the front to the back.
  5. Optional yellow strips- Cut out 3 pieces long enough to go across each of the front flaps and back of the vest.
Step 2: Assemble the vest

Glue or sew the black trim to the edge of the vest. If you had to piece together the lining because the felt scraps weren't long enough, don't worry! It's black, it hides that kind of stuff nicely :) This is a good point to add any yellow accents you might want too.
Sew or glue the shoulders together before you fold the vest down and attach the side strips. The only trick here is to line 'er up real good.

Step 3: Add 2" velcro pieces to the front of the vest
This is optional, but I put little scraps of velcro I had on the front of the vest to keep it closed.

No velcro? No problem!

Felt will actually stick nicely to sand paper, if you have that laying around I happen to think it's very construction worker-esque to have something like sand paper glued to the front of your vest. Or just leave it open.


For the hat...
While I wish I were crafty enough to make a hard hat like this... I'm not. Or at least I don't have the time. I actually picked this up from the beloved dollar section at Target! I also spotted some hard hats at our Dollar Tree when I picked up his awesome pack of plastic tools to go with the new dress up digs.
The only snag was that the hat was waaay to big for both of my kidlet's wonderfully small heads. Small heads might sound like a bad thing, but not to the one who had to give birth to them! Anyway, my friend gave me the brilliant idea of gluing a piece of elastic across the middle to help secure it on!
Loved the idea almost as much as I love my friend!


Just in case I haven't convinced you that this construction outfit is ridiculous cute with my pictures...

I decided to risk letting you hear my awful camera voice just so you could join me in melting over this little guy's very new runway walk!

Who doesn't love seeing the toddling steps of new walker??

Wednesday, October 27, 2010

Counting by numbers

First, we consulted the oldest and wisest of all our children to tell us what number she was...
Without hesitation she proudly choose number 1, of course!

Next, we asked the little guy what number he was...
He may not be the oldest or wisest, but in his short lifetime he sure has learned that when his big sister gives him something to play with he should quickly and quietly take it, because that kind of generosity doesn't last long from 2 year olds... so Jonah was happy to take the number 2.

Knowing that 3 comes after 2, which came after 1, Little Miss Mathematician started asking mommy who the number 3 was for....

Well.... looks like we'll find out in April!!!!

That's right! We're expecting our third bundle of joy at the end of April!

I'm 13 weeks and some days with a nice little bump to prove it!

I want to thank all of you for hanging in there these past few weeks while I sort of admittedly just checked out. Out of all three pregnancies I have certainly been the sickest with this one. I couldn't do much to get off the couch or out of the bathroom let alone try to sew, create or blog, but at nearly 14 weeks I'm feeling much better and ready to go!

It'll be a slow start getting back in the swing of things for a few weeks, but hopefully with all this 2nd trimester energy I should be plugging away in no time :)

Wednesday, October 6, 2010

Home Sweet Home

Hip, hip hooray!

Home sweet home at long last...

Because I'm still slightly uncomfortable with the idea of everything about my life being published online I didn't mention that we were heading out for a two week escape to cooler climates, wedding dancing and family fun....


but we did...

and now we're home!

I thought we'd never get here after a 10 hour escapade on what should have been a 2 1/2 hour flight. I'm sure 10 hours on an airplane with 2 babies is completely feasible, but I guess when you're only planning for a fraction of that time it can throw you for a little loop.

We started off with the kids happily fed, entertained and peacefully contained in our laps until the captain announced that there was a storm over Phoenix that we were waiting to pass while circling above Flagstaff. Well, about 30 minutes later the storm was still a stormin' and we were running out of fuel, so they decided to have us head over to Las Vegas for a "quick" stop to refuel and we could be on our merry way.

Because we were only supposed to fuel up and head out they wouldn't let us off the plane or even out of our seats for that matter...

3 hours later they realized that we weren't going anywhere with about 50 planes ahead of us on the runway. By the grace of God, and the federal regulation that now says you can only keep passengers on the tarmack for 3 hours without take off, they let us off for a brief 15 minutes to grab dinner and hunt for milk. Since naturally, they don't have milk on airplanes, and even if they did they wouldn't even allow us to use the restrooms, get delicious airplane food or even water during this 3 hour wait, I guess milk on the plane probably wouldn't have done much anyway.

After racing up and down the terminal I found ONE restaurant, vendor or store who hadn't run out of milk yet to sell me 12 oz of milk for $3.50 in a plastic water cup. I don't know how much you pay for a gallon where you live, but I bought one yesterday for $1.68 in Scottsdale, AZ. I should've brought the screaming Jonah along with me for a sympathy discount, but honestly, for as thrifty and frankly cheap as I am I didn't bat an eyelash at the price for the coveted napping I knew would follow this miraculous liquid.

After another 2 hours inching through the runway line we were finally in the air and on our way home. The kids were so excited to be home and in their own beds that even Sienna, our midnight cuddle-er, slept all alone all night long! She was so glad to be home, in fact, that I woke up thinking she was still fast asleep only to find her quietly playing with her babies in the toy room all alone. Who knows how long she had been awake?! It's the small blessings like this that help us laugh off our measly travel saga.

On the bright side, we were extra disappointed thinking we might have missed a good Arizona rain storm until later Tuesday morning we got a taste of the wild side....


That's actual hail coming down!!

Did I mention it was still 70 degrees out??

Aaaah, it's good to be home :)

For every second that Sienna missed her baby dolls I think I missed my sewing machine a little more... so be ready for some fun stuff coming next week!!
Related Posts with Thumbnails