Monday, August 30, 2010

Formally known as the bathroom remodel


....is now our fancy new bathroom!Ok, maybe fancy is relative here, but I assure you few elmo faucet protectors have ever seen such labors of love.

Sienna is also quite proud of

"my bathroom Daddy made Sienna"

and demanded that wanted her stool to be in this picture. It's the wrong green, but hey, it's a small request for a recent potty trainee who had to relearn where to use the potty just when she thought she had it figured out during our month (yikes) of construction time....

I know I promised an unveiling on Friday, but at the last minute we decided to put molding around the window and order new blinds for it. So we spent Friday and part of Saturday rushing to wrap that up too. I guess when you're on a roll you might as well keep on!


I forgot to mention after the tiling how to that you need to caulk around the shower when you're finished as you can see in that pretty white line around the tub.


We used a premium waterproof silicone kitchen, bathroom and plumbing caulk between the tub and the shower. We used an all purpose waterproof caulk along the edge of the shower and the wall. 
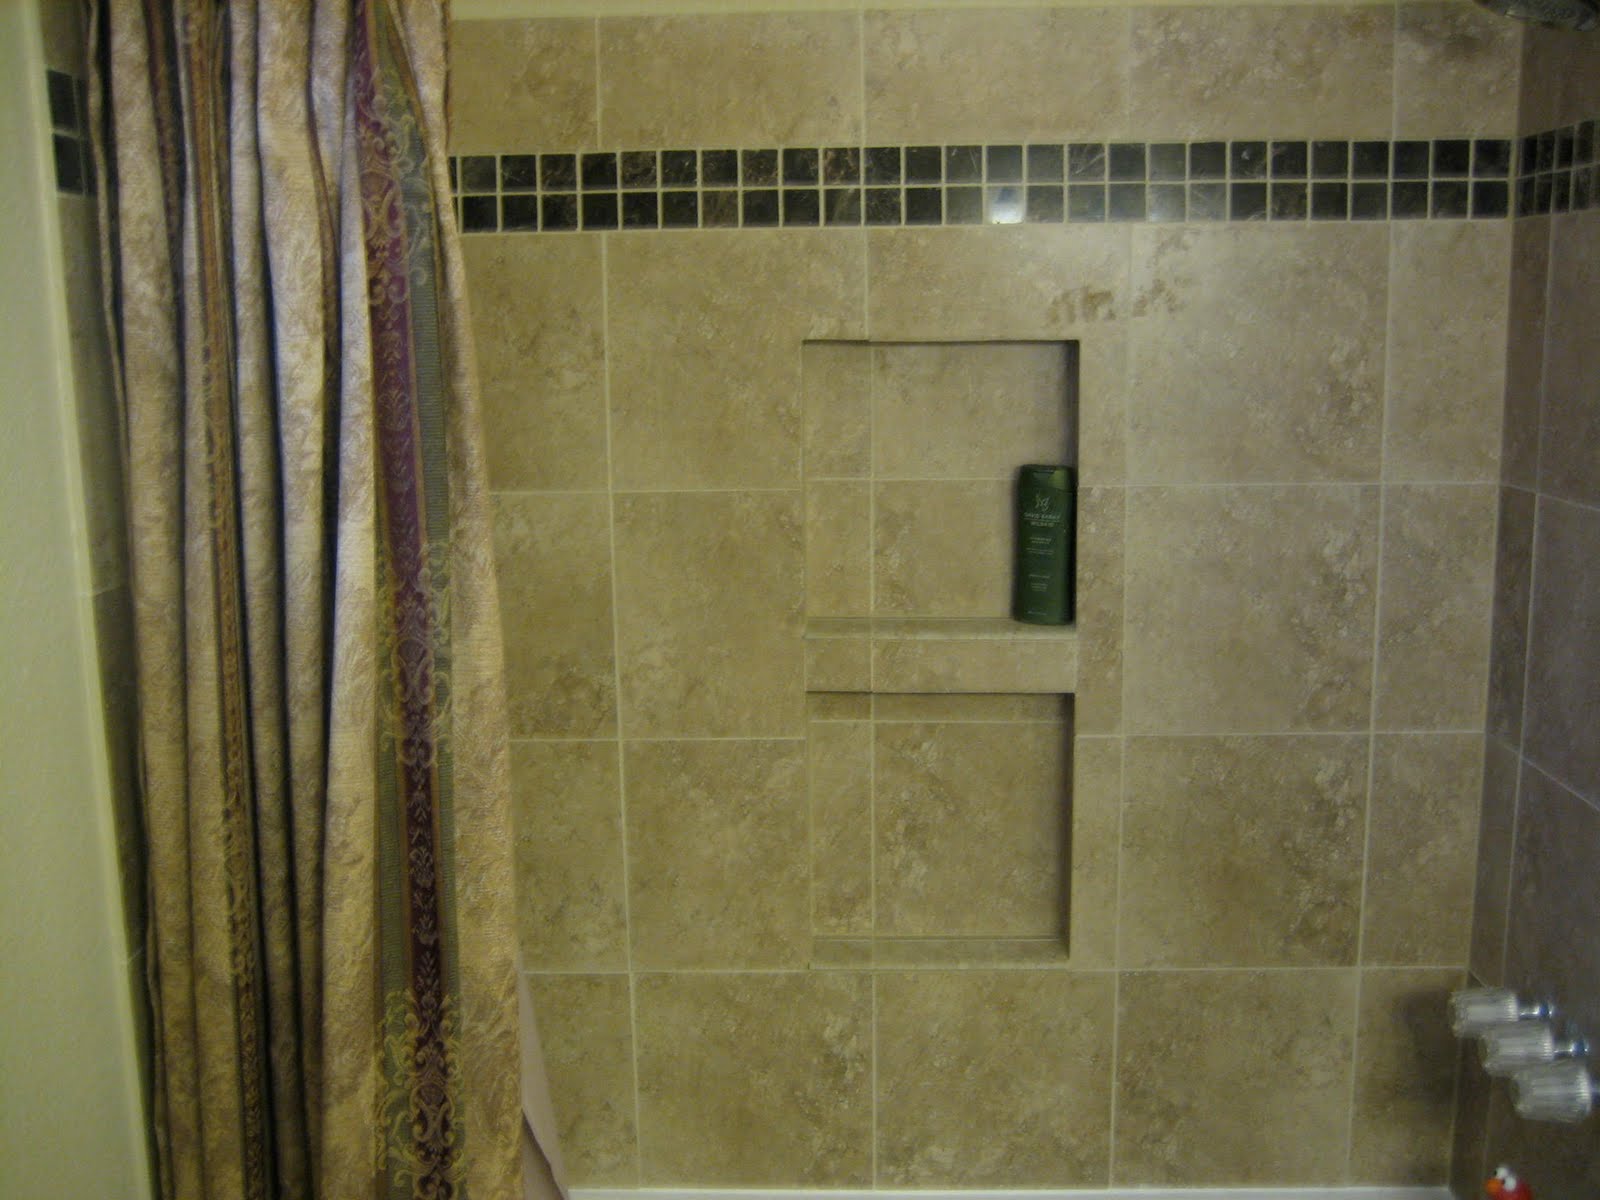
I hate to admit this, but I think these double shelves alone make this shower ten times better than our master bath!

Hi Elmo!

I also really love the rain shower in this bathroom. It has just the right amount of pressure and position. Yup, we both keep showering in here instead of ours... maybe it's just new :)


So there she be!

Our new guest bathroom.

Thursday, August 26, 2010

It's tile time!

Oooooh this is a big one!

And before I start I have a tiny confession to make.... I have to reveal a teeensy little lie here. Ok, not a lie, more of a failure to provide all of the details at once :)

Our "tile time" is really more than just a day as it would appear in my bathroom by Friday ordeal here.

Phew, that feels better!

Yes, it's true. We started the tiling part a while back and have sort of slowly continued working on it here and there, which is partly why it's taken us so long to finish! If you ask me you just need to buckle down and get 'er done in one fell swoop! So what I'm going to show you here is a compilation of our progress since the beginning of construction and mostly throughout this entire week as we worked on bits and pieces of it while others dried, set or hardened etc.

So without further ado...

The Basics of DIY Tiling
1) It is easy
2) It can be a little time consuming
3) And much like sewing, but even more so you gotta measure twice three times and cut the tiles once!

Here's what you'll need:
  • Tiles
  • Thinset or tile adhesive
  • Notched trowel
  • Sponge
  • Tile cutter
  • Wet tile saw*
  • Carpenter's square or "tri square"
  • Tape Measure
  • Tile leveler
  • Chisels or scrappers
  • Grout spacers
  • Grout
  • Sealer
*For this project we needed the wet tile saw to cut marble accent pieces and around tight corners. However, the wet tile saw can be optional, especially if you are covering a basic area that only requires straight cuts that can easily be done with a tile cutter.

Here's how we did it:

This is my explanation of how
we did it, but for a good video tutorial to help you tackle your own unique space take a look here.

Step 1
Remove the existing flooring, floor boards and any other major objects in the room such a toilet etc.
Step 2
Carefully measure the surface area of the room or space to be tiled. Decide what size tiles you would like to have and if you want to include any special designs or contrasting sizes. Once all of these decisions are made you can begin calculating how many tiles you'll want to buy. Most tile stores let you return any unused excess tiles, so over buy just in case you have any breaks or miscalculations (because most people do!).

Cost:
About $0.69-1.99 per square foot for ceramic tile, a little more for porcelain and a double or so more for travertine. The marble comes in sheets of pre-cut cubes for under $10.

Step 3
Do a dry run lay out with the tile on the surface to cover. Don't be afraid to mark on the ground or shower before you place the tile down to help you. Some people use a laser leveler to draw lines on the surface as a guide before beginning.

When laying out the pieces start from the edge and work your way in, so that the full size tile will be on the edge of the shower or closest to the door of the bathroom floor. It's important to leave about 1 cm spacing around each tile for the grout. Once all the full size pieces are mapped out, begin measuring for the additional cuts.

Step 4
Use the tile cutter to cut the end and corner pieces of tile.

Step 5
After ALL of the tile has been laid out for a dry run, you can begin mixing the thinset or tile adhesive to lay the tiles down.

During this remodel we discovered the wonders and joys of pre-mixed tile adhesive!!
This stuff is almost double the cost of the powder, but more valuable than it's weight in gold! Since this stuff doesn't harden quickly, so you can start and stop tiling at your leisure, which we know is a beautiful luxury when you're working with the kidlets at your feet.

Step 6
Use the notched trowel to lay out the tile adhesive on the surface with evenly distributed grooves going the same direction.
It's important to make sure there is an even amount of adhesive covering the surface, so that the tiles will all be level as you lay them down.

If necessary, stop and scrap or wipe off any excess with the edge of the trowel or a sponge to even it out.
Always use a leveler to double check the alignment of the tiles before the adhesive sets.

Another method is to plop to stuff right onto the back of the tile and smooth it out from there. This works nicely in hard to reach areas, but it's easier to get a level surface if you rake the adhesive directly onto the surface to be tiled.

Step 7
Put a tile spacer in between each neighboring tile to keep them evenly spaced across the floor or shower.
This is a good point to use your scraper or sponge to clean up any seeping adhesive between the cracks while it's still wet. You need ample clean space between the tiles and enough clear depth to fill it with grout.

Step 8
Allow the tiles and adhesive or thinset to completely set for at least 48 - 72 hours without walking on them to ensure they stay level.

Once they have thoroughly dried, start removing the tile spacers and scrapping off any excess adhesive from the spaces between or the surface of the tiles.
Jonah was absolutely dying to get in there and help the entire time. There's just something about that little man... I have a sneaking suspicion that he's bound to be Mr. Fixer Uper like his daddy! Let's hope so :)

Step 9
Mix the grout in relatively small amounts that you are sure you'll use in that setting, because it will dry up fairly quickly.
Use the smooth side of the trowel to spread the grout over the tiles, making sure to get it between each tile.
Use the flat edge to scrap it across the tiles and into the spaces as much as possible.

Step 10
Use a damp sponge to clean off the excess grout from the surface of the tiles.
Repeat a few times until the grout is completely off the tile surfaces and fully compacted into the spaces.


Step 11
Allow the grout to dry for 72 hours and cover with a protective sealer.

AND DONE!

Jeez, my fingers are about to fall off from all this typing! Hope you made it to the end here, but now you're really going to love me, because I just have to make you wait to see the finished tile until the unveiling tomorrow afternoon :)

What fun would a sneak peak be? The tiling is the biggest part!

Tuesday, August 24, 2010

Building the shower

Naturally, as soon as we laid eyes on the Easter bathroom we knew it would require serious overhaul remodeling, but with the a tight budget we decided to settle for a temporary coat of normal color paint to cover the baby blue until we could afford to tile.

Fortunately, or not, our timeline was moved up a little when we discovered that the shower board backing wasn't properly attached and started falling right off!We looked into a quick fix with pre-manufactured shower kits starting at $800, but of course we couldn't stop thinking that we could just build our own shower and slap some tile on top for the same money or less.... so we did.

And here's how we did it:

Step 1

Removed the faucet and handles. Peeled (at this point) off the deteriorating shower board.
Ew, I just cringe to think we were trying to clean ourselves in something like this!

Step 2
Tore out the backer board and built 2 boxes for inset shower shelves.
Step 3
We learned the hard way from our first shower that you need to make the shelves a lot bigger than you might think to actually hold all the crap essentials a woman needs in the shower. Naturally, the 2 X 4 spacings weren't big enough to squeeze in our 16" x 16" box that would become our top and bottom shelves, so we carefully sawed into one of the 2 x 4s to make room.
Once you have a cut out, simply secure your box to the 2 x 4s and wall.

Step 4
Cut new 1/2" backer board slabs to cover the exposed surfaces.
Don't forget to cut holes for your faucet, handles and shower head if it will be covered by backer board.

Step 5
Secured the fitted backer board to the wall with titanium coated screws along the studs (2 x4s) in the wall. We ended up using one screw ever 6" up. The trick here (And because it was so tricky, the kids, the camera and I were all furiously shooed out of the bathroom. Leaving us pictureless for this step. You must know how these things go don't you?).... anyway, the trick here is that you have to be careful to make the board as level to wall as possible to avoid leaks and so the tile will lay flat and smooth.

Tah Dah!
Flat and smooth against the wall.

Next up.... we start tiling!!!


Almost new cabinets

After the baby blue walls and light pink tile, the one thing that I was most anxious to part with from our inherited Easter themed bathroom were the boring old, marked up cabinets. The cost for a new double sink vanity and cabinets even with DIY installation would have been around $1500.

GASP!

Waaay out of our budget, so instead we decided to give our existing ones a face lift with quick sanding and paint job.
Which takes us to our first "how to" of bathroom remodel week....

Cabinet Remodel DIY

Step 1
Removed the cabinet doors and drawer covers from the vanity.

Step 2

Sanded the entire unit, doors and drawer covers with a 150 grit sand paper.I used an electric sander to speed up the quite tedious process, but had to switch to the old fashion way (my own two hands) to make sure I smoothed out ever nook and cranny.
The wood should feel completely smooth and free from any gloss or shine when it's sanded enough. Be patient and thorough, this step makes a huge difference later on!

Step 3
Use a damp towel to wipe down the unit, doors and drawers after you finish sanding until it's clean from any dust particles from sanding that will show through the paint.


Step 4
Slap on your first coat of paint making sure not to clump the paint in any of the corners or edges.

Don't forget to do the floor boards that go around the vanity!

Step 5
This step is the doosey! Back to the sanding...

Once the wood is coated with paint (might take two coats), re-sand the entire thing by hand this time using a 320 grit sand paper.

Ah! Are you kidding me?

Nope.

This will get rid of brush strokes and make the finished product much smoother and professional looking.


It'll also give you a chance to smooth out any of the corners or edges that the paint might have clumped in.

Step 6
Give 'em all one last coat of paint making sure your brush strokes go in the same direction.

Step 7
Put it all back together and admire you're almost new cabinets!

Unfortunately, this is all you can get for "after" shots, because we just can't spoil the whole package until we're completely done!


Total cost:
Less than $25 for 1/2 gallon of left over paint from our master bathroom remodel, brushes and sand paper.


Also...I'm too excited about this little story that I'll run the risk of bragging just a teensy bit here....

Last night, our neighbor, who happens to be a professional painter, came over to look at our progress last night. You see where this is headed right??

Guess what he asked us?

Where we bought our new cabinets from?!!

EEEE!!! He couldn't tell they were the old ones re-painted?! Best compliment ever without him even knowing it :)

Monday, August 23, 2010

It gets this remodel moving again...

We started smashing, tearing and undoing our second bathroom about...
oh boy, a month ago now...

...time sure flies when you have a DIY remodel to procrastinate doing finish up.

Naturally, I knew we needed a little nudge to get us going past the initial destruction clean up, so I decided to plan a little soiree this weekend with a few of our closest friends. As the guest list approached 40, we realized that
  1. I really can't only invite a few people to anything
  2. We couldn't have everyone peeing in our bushes, so we had no choice but to roll up our sleeves and get to work!
Turns out that this whole cram the remodel into one week, but get to work on it together thing is actually so much more fun than dragging it out over months and months and months like we did with our master bathroom.

Plus, since it's all we get to do until the party I had the idea to document our step by step progress and share the behind the scene "how to" details of the remodel with all of you!

Before we begin, let's take one last, long, nauseating look at the original baby blue walls and light pink tile bathroom...
What were these previous owners thinking?

So long Baby Blue!

And three cheers to the hopes of a new bathroom by Friday!

Thursday, August 19, 2010

Laced to a Tee Skirt

From humble beginnings, a little old t-shirt slowly transformed....
into a beautiful lace trim skirt!

Remember a few weeks ago when I shamelessly showed you this, but said I couldn't tell you what it was in case I managed to salvage it?

Well... luckily it wasn't trash day, so the next morning I thought better of my slight outburst and pulled 'er back out of the dump to at least stuff in a craft drawer until I mustered the creative courage to try again. After the delightful afternoon of window shopping around the bloggy blog world I was telling you about here, how could I not be feeling creatively gutsy once again?

I just loved how quick and simple the
Toddler Skirt and Shirt by Lil Blue Boo was, which was just the perfect thing to recover my originally sundress bound and already half way cut up shirt into...
But of course I couldn't help adding my own little spin to it, so I spiced it up with some lace trim along the bottom.
I learned my lesson from the sleeveless yoke dress that an outfit isn't complete if it doesn't have pockets. So I decided to add a dainty miniature gathered pocket right in front with a matching lace bow to tie it all together.
Naturally, the pocket was Sienna's favorite part until she discovered that nothing goes better with lace than mommy's heals and pearls!
During our modeling session she was simply too busy with phone calls to look at the camera. When I asked her if she could look at Mommy for a picture, she stared at the ground said in her adorable and strangely almost English accent,

"Mommy, I just can't look at the camera right now, OK?"

I suppose I'll just have to get in touch with Ms. Sienna's agent at a later time.... for now, this is as good as it gets.

Silly girl, where does she come up with this stuff?

Monday, August 16, 2010

Wondering what to do with an old t-shirt?

Oh boy, do I have some ideas for you!

I could spend all afternoon finding the end of the crafty blogging world looking at all the creative ideas out there...
so the other day I did just that!
If you've seen my Hubby Tee Tank you probably guessed I am a sucker for a good t-shirt refashion! It's no surprise I almost ripped the shirt right off my husband's back when I saw these...

Get ready, because you'll probably need to start sewing after you read this!

A little somethings to sew for you:

1. The Ruffle Shirt by Sachiko at Tea Rose Home


2. Anthropologie Wrap Tee by So Happy Together
Refashioned Shirt Tutorial


3. Another unbelievably cute Anthropologie tank top by So Happy Together-
Anthropologie Inspired Refashion


A little somethings to sew for your home:


4. Ruffly Gathered Pillow by A Quiet Little Life


5. Flower covered wedding ring pillow Vanessa of V & Co

A little somethings for your little yous

6. The Beach Comer Dress by Ruffles and Stuff

7. Toddler Skirt and Shirt by Lil Blue Boo.


A little somethings for your babies

8. Infant Gown by This Mama Makes Stuff


9. T-shirt Sleeve Baby Hat By Homemade by Jill


10. Ruffle bloomers by Blueberry kisses

How am I ever going to steal no sneak borrow all the t-shirts from the Mr. that I'll need to do these?!


So much inspiration so little time!!


What's your favorite??
Any other good tee make ups out there that I missed? I'd love to keep adding!
Related Posts with Thumbnails