You've got it!!
I'll show you how I make a basic sundress without even using a real pattern, plus I'll even throw in a few extra steps to jazz it up along the way!!
Here's what you'll need:
- About 2-3 hours- depending on how much detail you'd like to add. I can do the basic sundress in 45 minutes, but I've had some practice!
- 1 1/2- 2 yards of fabric
- Buttons, snaps, zipper or elastic for the back
- Basic sewing essentials(machine, thread, needles, iron etc)
- Any type of decorative additions like ric rac, ribbon or bows
I threw in a little of everything for this dress to show you some options, but feel free to pick and choose based on your skill level and time.
The options are.....
A couple front gathered pockets with decorative stitching
(beginner-intermediate)

Easy front pleating for a little extra texture
(beginner)

Peaking ric rac and double ric rac straps
(beginner)

Contrasting bottom hem with decorative stitching
(beginner)

Tempted enough????
Let's get started!
Step 1: Make your "pattern"
Use a dress that fits to draw a pattern piece for your bodice by folding the bodice of the dress in half and tracing the outline onto a piece of paper (note book will work just fine).
 No sundresses that fits handy?? No problem!
Just trace around your child's chest allowing room for ease and do a few simple calculations to figure out the width of you bodice piece like so:
Chest circumference (around chest) + 1 (seam allowance) + 1 (ease)/4 = length of bodice
With my numbers it looked like this for a 2-3T dress: (22 + 1 + 1)/4 = 6 inches
Most back piece heights are 2 to 2 1/2 inches, so I just used 2 1/2 as my height leading up to the under arm and about 4 1/2 to the top of the chest.
You can use any type of shirt that fits to get the slope of the arm hole and the desired chest height in front.
Decorative option: Front pleats
If you'd like the bodice of your dress to have pleats, add 2 inches extra to the width, so instead of 6" for mine I used 8"
Step 2: Cut out 2 bodice pieces from your fabric along the folded line
Pin the pattern you created in step 1 onto a folded piece of fabric with the tallest part (or center of the bodice) along the fold.
Cut along the lines.

You'll need to cut two bodice pieces:
1 for the front that will show
1 for the back as extra lining.
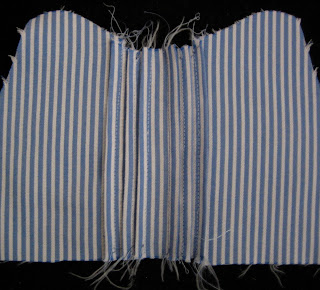
If you are doing the pleated version, you'll need to make sure you cut 1 piece with the pleat extension as shown in the picture above and one without as shown in the pictures below.

For the pleated version you'll end up with two folded bodice pieces one two inches wider like so:

Step 3: Measure and cut out 4 back pieces and 2 body pieces
Back pieces
Use the same height and width measurements of your bodice piece to cut 4 rectangular back pieces. For this dress, mine were 6" X 2 1/2"
Body pieces
You'll be gathering the body piece, so make your cut approximately 1.5 times 1/2 of the child's chest measurement by your desired length. For this dress I used 1.5 (22/2) + 1 (seam) = 17.5" and then rounded it up to 18" for extra gathering :)
 Don't worry, I'm not trying to pull a fast one on ya by labeling the length of the body as 15" in this pictures.... it's not! But that's ultimately what I cut my dress to, but since I was using my fancy new serger I just decided to leave the fabric in it's original length and cut it off later with my machine :) I love that thing!
Step 3.5: Sew in your pleats. Skip ahead to step 4 if you don't want pleats
Unfold the extra long bodice piece and mark out 4 1/2 inches in the center.
(4 1/2"??? We only cut 2" extra on each side. Don't panic, just trust me, it works out to be 6" and the same length as the back bodice piece)

Using a fabric pen or chalk mark off 1/4" space for the pleats every 1/2"

Starting at either end fold the fabric at the 1/4" marker so that it touches the next 1/4" marker and pin.

Sew along the pin fold you created to make your first pleat.
 Continue for 3 or 4 pleats (until you get close to the center) and then switch sides, so that the pleats on each side of the center face away from the center.

Flatten the pleats with a hot iron.

And admire your handy work :)
If you're still a little confused and want to read it from a different "voice," Rae also has a good tutorial on how to do pleats in her Spring Ruffle Top.
Step 4: Sew your bodice pieces together
Lay the bodice pieces together, so the same sides are touching and pin in place.

Decorative option: Peaking ric rac border
If you want half showing ric rac to line the bodice, simply sandwich it between the two bodice pieces and pin in place before you sew them together :)

Sandwich a strip of fabric for your dress straps at each "hump" in between the two bodice pieces. This way you won't have a seam showing where you strap goes.

I used two 8 1/2 in long ric rac pieces for each straps, but you don't like this look you could easily create your own or premade ribbon works well too!
Sew the bodice together with a 1/4" seam
 (Notice there aren't straps in this picture?
Yup, I forgot the first time and had to go back, seam rip and add them in! Thank goodness for that seam ripper sometimes...)
Fold right side out, press flat and give yourself a pat on the back for the fancy ric rac lining :)

Step 5: Sew your back pieces together
Sew 2 sides of your rectangular back pieces together leaving the other two sides open so you can fold right side out later.

Optional add ric rac lining in the same way as step 4.

Fold right side out and pin it to the end of your bodice.

Serger or sew together with a zig zag stitch on each side. The inner ends of the back pieces should overlap slightly to allow for a button or snap closure.
Step 6: Gather the body pieces
Gather the top of each body piece until it is the length of your unfolded bodice or 12" in this case.

Step 7: Attach body to bodice.
Lay the gathered body on top of the bodice piece so the right (or front of the dress) sides are facing each other and pin in place.

Serger or sew the bodice and back pieces together with a zig zag stitch.
When sewing the back pieces, allow one of the sides to overlap the other back piece to leave room for a button. If possible, carefully have the little one try it on with while it's pinned in place. If you find you're out of room to overlap, you can also make loop closure buttons that do not require overlap.

Once attached to the bodice, serge or sew the sides of the body together.
Decorative option: Gathered pockets
After attaching the body to the bodice and before you sew the sides of the body together is the best time to add front pockets! This way you can test exactly where the pockets will fall, so it's the perfect arm length on your dress.
I won't go into a gathered pocket tutorial to save room on this post since Dana already has an excellent one here!
Step 8. Mark and sew on buttons (or other back closure)
Temporarily pin the back buttons in place, so you can mark with a fabric pin the top and bottom of where you'll want your button hole.
 Sew your button holes and rip open with a seam ripper.

The best way I've found to sew my buttons in place is to lay my button holes over the bottom fabric and mark the point by point straight threw the button hole like above.

When you pull back the flap you should have a marking exactly in the center of your button hole :) Sew the button on there.
Step 9. Attach the back of your shoulder straps
The quickest and easy way to do this one is to just throw the almost finished dress on your little one and mark where the back of the straps should go.
But that's rarely an option since most of us sew during sleeping hours... so instead, I used a dress I have to estimate how long the straps shoud be and it turned out I was pretty dead on with 8".

When you've found your mark, sew the end of your strap along the hem of the back pieces at a slight inward angle to avoid bowing.
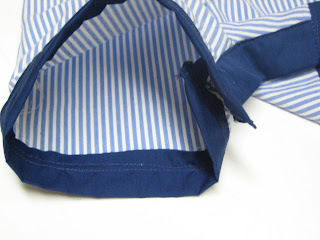
Step 9. Add a bottom hem
Finish the dress by adding a bottom hem all the way around.
Decorative option: Contrasting hem
You can make an easy decorative hem pre-made or home made bias tape and a little decorative stitching like I did here. Or you can simply fold up and hem the existing bottom.
That's it!!! Finally, you're done :)


 Or more likely, it's because I absolutely love little boys in overalls, but let me tell you that I was NOT glad I was doing this for about 2/3rds of the time I was doing it....


