Friday, July 30, 2010

Turtle pin cushion love is in the air

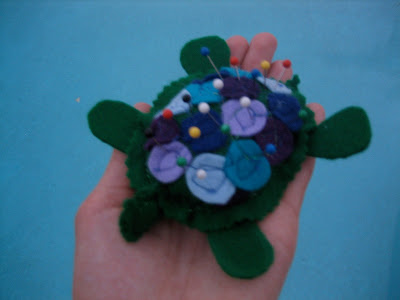
I love the turtle pin cushion that I made a few weeks ago

It was so quick and easy to do how could I not?!

And maybe because it has only been a few weeks I still can't help but smile every time my new buddy "hands" me a pin :)

Little did I know turtle pincushions are much like our children.

Even though we love them and think they are unreasonably adorable, most of us can appreciate when we see another really stinkin' cute kid!

(who we may or may not be willing to admit is slightly cuter than as cute as ours)

Do you see where I'm headed with this?

Look at the turtle pincushion I came across today at Craft Passion!
A bit more involved, but so creative and lovable!

Go ahead, I know you still love me... you can say it

You want to make one of those too don't you?

I don't blame you!

Thursday, July 29, 2010

Summer swim lessons with a splash!

Summers in Arizona have taught us to love having a pool at our house.... ...especially when you can keep your two year old just like this.

But sometime last year her and Mr. Hippo must have had a falling out and she stopped wanting to float around with him in the pool.

So for this summer we knew swim lessons were in order FAST!
Obstacle courses, one on one attention from Mommy?

YES PLEASE she said!

Not surprisingly, she felt right at home and in no time at all she was actually swimming all by herself!


PHEW!

Just when I thought we could rest assure that our little fishy learned how to swim, just went I thought she could finally be safer in the water...

I was reminded that she is her father's daughter.

It was only a matter of time before she started trying stuff like this...


(to view, click on the play button even if no image is shown)


Will a mother ever sleep without worrying??!

As for Daddy, well, he was excited to point out that at least she made it to the side.

Yes, at least she did.

Wednesday, July 28, 2010

Quillow Pack Tutorial


Ok, ok, twist my arm.
..


Of course I'll share my quillow pack tutorial with you!!

You guys knew all along that I'd post it whether you commented or not, but can you blame me for not so subtly trying to coerce you into leaving more comments???

I can't help it!

I just really love hearing from other people like what they think of my hair brained ideas or similar ideas of their own or even just how their day is going.

So please, please, PLEASE send me fun comments to read :)

Did you get that?

Ok, just checking!


Now, for the moment you all have been waiting for...
at least for the past 20 seconds after you clicked on this post

The 10 quick steps to your very own Quillow Pack (park date sold separately)

Materials
  • 1 1/2 yrds each of two coordinating fabrics for the back and front of the blanket (3 yrds total)
  • 1 1/2 yrds of fabric for the pillow casing and pack straps
  • 1 3/4 yrds of cording or ribbon to close the pack
  • Optional- extra scraps to make a front pocket on the sack
  • 2 1/2 hours uninterrupted sewing time.
Assume 1/4" seam allowance unless noted otherwise.
Measurements are for a 44" x 53" blanket that folds into an 18 " x 18" pack

Here we go!
Step 1
Measure and cut the following pieces of fabric:


Two large pieces of fabric 44 1/2" x 53 1/2"
Two 18 1/2" x 20" pieces of fabric for the pillow casing Two straps 2" x 27" for the pack straps and

one strip of fabric 1 1/2" x 18" for the draw string casing on the blanket


Step 2
Sew the 2 pillow casing pieces of fabric with right sides together and flip inside out.

Optional- sew a small pocket on one side of the pillow case. You can leave it open or close it with a button, but you should do these details now.

Step 3
Make a 1" casing for the draw string on the 20" side of the pillow casing by folding the edge down so that you end up with an 18" x 18" case.
The 1" casing will be the side farthest away from the edge of the blanket when you sew the pillow case on.

Step 4

Use the finished pillow case to trace the outline for the pillow case on the top center of the blanket piece that you would like to be the "bottom" side or the side that will touch the ground.
Next, make an additional line 1" below the bottom of the pillow case square for the draw string casing to close your sack.


Step 5

Fold the small strip of 1 1/2" x 18" fabric into a 1" wide casing (or wide enough for your ribbon, cording, draw string etc) along the bottom of the pillow case outline on the bottom blanket piece.
Don't forget to leave the ends open so you can run the draw string through!

Step 6
Sew the blanket pieces with right sides together on three sides first, leaving the 44 1/2" edge with your pillow case outline open.

Before flipping right side out again, sew 13" in on each side of the 44 1/2" open side, so that you have an 18" opening to flip the blanket right side out with right in the middle of the blanket where the pillow case will go.

Step 7

Make two 1 1/2" x 27" shoulder straps.

Tuck about 1" of the end of each strap inside the blanket at the edges of the pillow
case outline and pin in place.
Sew along the edge twice to secure each strap to the blanket. Once the straps are each sewn inside the blanket, close the rest of the blanket by sewing along the edge between the straps.

Step 8

Bring the other ends of the pack straps to the center of the pillow case outline along the edge of the draw string casing you created in Step 6. Pin them in place at an angle right in the center like so:

I went ahead and snipped off the tip of the triangle I created when I folded my strap at an angle. You don't have to re-hem, because it will be sewn over anyway.
Secure the straps by sewing over twice.

For now, Pin the straps along the center of the pillow case outline to keep them out of the way while sewing on the pillow case in the next step.

Step 9
Sew the pillow case onto the bottom of side of the blanket along three sides with the opening for the pack (the side with the draw string case) facing downward and unattached.
Don't forget to put the side you want to show on your pack face down so it's touching the shoulder straps. In this case I have my pocket side facing down, because that's what I want to be on the outside of my pack when I fold the quillow up.

Step 10
Use a safety pin to pull your cording, ribbon, string etc through the draw string casing on the pillow case and bottom side of your blanket.
Tie knots at the ends of the string to keep it from sneaking back into your casing.

Repeat for the front and pack casings


And that's all!

She's ready for testing.... Fold in thirds like I showed you with my first pack. Or by clicking here.
Does it work?

Great!

Onto phase II of the testing... pull the draw strings to close the pack and throw it onto your shoulders.
Does it fit?
Well... ok, so maybe mine wasn't designed for this size model, but you get the idea!


Last but not least, head to the park with your quillow pack full of all your park date essentials...

Don't forget the BUBBLES!!

The kiddos love this stuff, even if they can't quite figure out how to blow just right...

Btw, recognize the fairy ballerina dress Sienna's wearing? Yup, we can't get it off her....

Tuesday, July 20, 2010

A park date in a quillow pack

When it's not hot enough to melt your shoes to the sidewalk our favorite playdate is a picnic in the park with our friends.

Swings, slides, fresh air, green grass, sand pits, splash pads, food all over the ground that you don't have to mop up.... what couldn't be wonderful about this?

The packing.

The ridiculous, you'd-think-we-were-packing-up-our-house-and-moving-to-the-park amount of stuff you have to tote along with you for a morning of fun. Sack lunches, water bottles, sun screen, hats, glasses, sand toys, picnic blanket, swim suit, towel, diapers, wipes, stroller, your sanity...

(Look at our stroller! I was lucky to have enough room for at least one kid.)

Even the most skilled husband car packer would never be able to squeeze, pile, shove all that stuff onto my cargo ship of a double jogging stroller. I feel like a Dr. Seuss book waiting to happen as I clench my teeth around my car keys and try to juggle a parade of park gear and children from the car to a shady spot to set up camp, I mean our blanket.

The solution:

My remix of the "quillow" have you heard of those? Quilts that fold into a pillow pouch? Maybe we were the only really cool kids whose mom made us take those to sleep overs.... well, this version of the quillow is more than just any ordinary quilt that becomes a pillow....

I prefer to think of this bad boy as a special, top secret sack pack with a hidden identity!

At first glance it's a normal sling back pack, but as you unload and unfold you see it magically transforms into a picnic blanket!


And right back into your secret pack by simply folding across in thirds like so

And then again in thirds vertically until you neatly tuck the blanket inside the pack......flip right side out and...

viola!

Now it's a sack pack all over again!


Now fill 'er up with all those sand toys, sunscreen, sanity and more!

woah!

Now that is what I call a walk in the park!


What do you think?
Will share a tutorial for comments!!! (hehe, I'm so sneaky!)

Sunday, July 18, 2010

Keeping a gardening in triple digit temperatures

....can require a little creativity

If you are hoping for something like this


And trying to avoid this

And don't have money growing on your trees either (no matter the weather).

Yeah, that's us. Our garden came to a scorching halt early last summer, because of the intense sun.

But this year... a wonderful idea fell upon us
during our Great Landscape when we noticed that we had tons of weed barrier fabric leftover.

Since that money tree is broken, we've been trying to reuse and up-cycle as much as possible, so naturally we had to get some more use out of this stuff that is so amazing and super cheap!


We bought really big rolls to do our entire yard, but you can get a 3' x 25' roll for around $10 at Home Depot. Could you imagine buying outdoor fabric for that cheap?

It's not the most stylish or even interesting looking stuff, but in addition to blocking weeds look at all the other stuff it does:
  • Saves Big on Watering, by conserving the soil's moisture
  • Provides complete weed control
  • Only fabric that is hydrophilic treated - letting air, water and nutrients through
  • Fabric is black on the back side, for the ultimate in light blockage
  • Uses multiple-layer technology
Letting air, water and nutrients through? Blocking light? Hum... You see where we're going with this??

We didn't need this to block weeds in our garden bed, but what if we put it OVER the plants to slightly limit extra sun?

GENIUS!

Ok, to be fair I should specify, Kevin's genius idea, but where would the idea be without the actual crafter behind it right?

Before

After

The nice thing is that it still gets rain water through and it doesn't completely block the sun like an awning or many other covers.

Plus, we left the sides open so the vine plants like our cucumbers and pumpkins can crawl toward more sun if they need it.

Why didn't we think of this last year?
Our garden was done by July for sure. But not now that we found the fountain...er cover of youth! Who knows how long we'll be growing now!

Saturday, July 17, 2010

Look what I got....!

Eeeeeeeee!!!!

My first brand new computer in 8 years (scary huh...)


I'm too excited to sleep!


Now I can do some of this...


A lot of this...

(Notice the new Photoshop software? FAh-ancy!)


And practice my super cool peering over my laptop look...

Ok, I'll have to work on the dork factor here....

I don't think the super cool coffee shop laptopers have exactly the same goofy tooth smile, but can you blame me just this once??


You know, this isn't just all about me or even all about Subtle Tee... there is a little something for all of us with this new gift.

Jonah loves the box


Sienna loves the photobooth


And I just LOVE it period!

Whatever our reasons, we are all very happy to have it!


Related Posts with Thumbnails