

A tank top refashion in less than 10 minutes
that doesn't involve any sewing at all???
that doesn't involve any sewing at all???

Of course!
It's so quick and easy, how could you not?
 (Happy birthday to my beautiful sister!! Isn't she so cute?!)
This fancy little tank remodel makes the perfect homemade gift and takes just 10 minutes. But that's not even the best part of all, it's almost mess free to make and simple enough that Sienna helped me make the entire thing for her Aunt Dani's birthday present!
 Here's what you need:


This might not be necessary, but depending on the type of doily you used you can dab a little Fray Blocker on the edges that you cut to prevent fraying. I didn't have to with mine, because I was able to clip along the string.
Use one for each side on the front and back.

Depending on the shape of the doily, you can also add small pieces to the center and bottom.
A little of this stuff goes a long way.

 Don't forget to repeat for the inside of the tank top too.
 ...or just leave it as is!
Did you try it?
Let me know in a comment or email. I'd love to see pictures and I might even show them off in a little post :)
 (Happy birthday to my beautiful sister!! Isn't she so cute?!)
This fancy little tank remodel makes the perfect homemade gift and takes just 10 minutes. But that's not even the best part of all, it's almost mess free to make and simple enough that Sienna helped me make the entire thing for her Aunt Dani's birthday present!
 Here's what you need:
- Any tank top new or old
- Any shaped doily (I got this one from my grandma's junk drawer, but they sell them at the Dollar Store for well... $1)
- An iron
- Optional button or pin for the center
- TOP SECRET NO-SEW AGENT- Magic poly web adhesive!! (I used the left over scraps from my Ikea curtains, but they sell this wonderful stuff at any Michaels, Walmart etc for a few bucks. Did I mention it's wonderful?)
Step 1
Press the doily in half so that it's nice and flat

Step 2
Fold the doily over the front of the tank so that one half of the doily is in the front and the other in the back.
Step 3
Carefully clip off any extra edges that don't lay flat on the neckline.
Step 4
Cut strips of the poly web adhesive to the length of the doily and carefully place between the doily and tank top.Use one for each side on the front and back.

Depending on the shape of the doily, you can also add small pieces to the center and bottom.
A little of this stuff goes a long way.

Step 5
Set the adhesive by applying direct heat with an iron for a few seconds. Don't forget to repeat for the inside of the tank top too.
 Step 6
Add a little button or pin to the center... 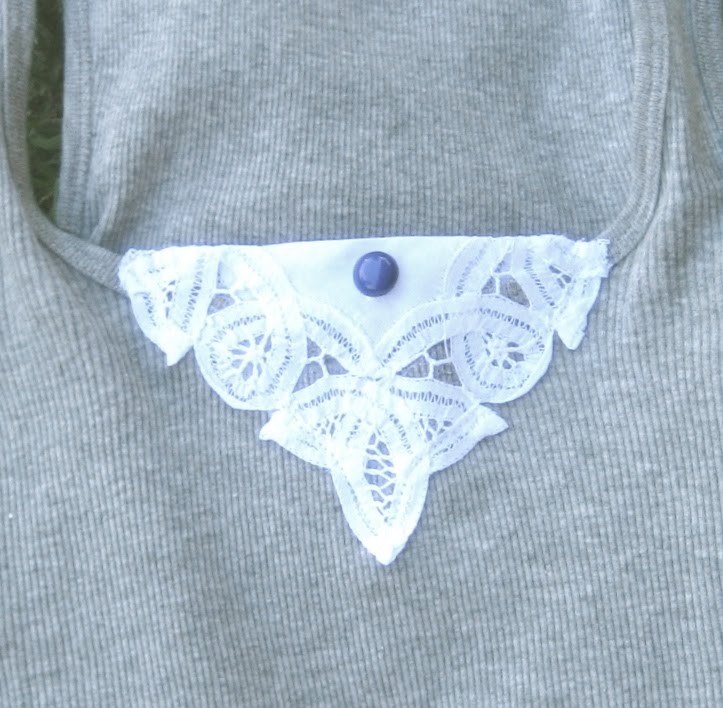 ...or just leave it as is!
And that's all there is to it!!!

Simple. Fancy. Lovely.

Simple. Fancy. Lovely.
Did you try it?
Let me know in a comment or email. I'd love to see pictures and I might even show them off in a little post :)


Love this idea. I may just have to try it with my $1 Doily!
ReplyDeleteI will try this. Very cute! Danny you look great. I didn't know they sell cloth doilies at the dollar store. Hmmm I might use a tea napkin, ideas flowing!
ReplyDeleteSo easy! Thanks! I hope you'll link to Make It Wear It today at TheTrainToCrazy.com
ReplyDeleteThat is SO CUTE! Thanks for the fun idea- we wear lots of tank tops in Texas :)
ReplyDeleteHow simple but elegant! I'll have to make this one myself soon.
ReplyDeleteSad that the last comment is from me back in July saying I'd be making these soon. Well, here I am over two months later *finally* done with mine. Thanks for the great tutorial! I love how mine turned out:
ReplyDeletehttp://sourkrautkrafts.blogspot.com/2010/09/no-sew-doily-adorned-tank-top.html
Such an excellent diy tutorial. Thanks for share.
ReplyDeleteEskişehir
ReplyDeleteDenizli
Malatya
Diyarbakır
Kocaeli
NCR
Diyarbakır
ReplyDeleteKırklareli
Kastamonu
Siirt
Diyarbakır
2RZ
rize evden eve nakliyat
ReplyDeletemuğla evden eve nakliyat
kırıkkale evden eve nakliyat
mardin evden eve nakliyat
istanbul evden eve nakliyat
0Q62Z
DC043
ReplyDeleteBolu Parça Eşya Taşıma
Adıyaman Evden Eve Nakliyat
Manisa Evden Eve Nakliyat
Diyarbakır Lojistik
Bitlis Lojistik
27388
ReplyDeleteBilecik Şehirler Arası Nakliyat
Batıkent Parke Ustası
İstanbul Şehirler Arası Nakliyat
Tunceli Lojistik
Osmo Coin Hangi Borsada
Nevşehir Şehirler Arası Nakliyat
Çorum Şehirler Arası Nakliyat
Erzincan Parça Eşya Taşıma
Siirt Evden Eve Nakliyat
B134B
ReplyDeleteManisa Şehirler Arası Nakliyat
Mamak Boya Ustası
Burdur Şehir İçi Nakliyat
Bitmart Güvenilir mi
Bartın Lojistik
Ankara Şehir İçi Nakliyat
İzmir Şehir İçi Nakliyat
Yalova Evden Eve Nakliyat
Muş Evden Eve Nakliyat
88BAF
ReplyDeleteProbit Güvenilir mi
Pancakeswap Güvenilir mi
Mardin Lojistik
Bursa Evden Eve Nakliyat
Kastamonu Evden Eve Nakliyat
Çankırı Parça Eşya Taşıma
Ağrı Şehir İçi Nakliyat
Edirne Parça Eşya Taşıma
Kırıkkale Lojistik
5FB15
ReplyDeleteBurdur Evden Eve Nakliyat
Artvin Evden Eve Nakliyat
buy parabolan
Çerkezköy Evden Eve Nakliyat
winstrol stanozolol for sale
order trenbolone enanthate
anapolon oxymetholone
primobolan for sale
order sustanon
883DA
ReplyDeleteindirim kodu %20
53A87
ReplyDeletekocaeli sohbet muhabbet
Rize Ücretsiz Görüntülü Sohbet
bartın kadınlarla rastgele sohbet
yalova bedava sohbet uygulamaları
izmir ücretsiz sohbet sitesi
istanbul random görüntülü sohbet
kastamonu sesli sohbet sitesi
erzurum ücretsiz sohbet sitesi
Eskişehir Rastgele Görüntülü Sohbet Uygulamaları
9F2DD
ReplyDeletecanlı görüntülü sohbet odaları
Eskişehir En İyi Ücretsiz Görüntülü Sohbet Siteleri
Burdur Mobil Sohbet Siteleri
Siirt Sohbet Muhabbet
sesli sohbet sesli chat
ücretsiz sohbet uygulaması
mobil sohbet et
parasız sohbet
Karaman Sesli Görüntülü Sohbet
218B3A1047
ReplyDeletetwitter gerçek türk takipçi
twitter beğeni satın al
twitter takipçi
instagram takipçi
kaliteli takipçi