Monday, September 27, 2010

long sleeve rock star tee

We're not too high on the originality scale here, but with all the girly sewing I've been doing I figured it was only fair to throw in a quickie for the little guy too!


And, besides, who doesn't love a blondie with a tight guitar skirt on??


I roughly free-handed the guitar silhouette and left the edges raw, so they could curl up for a kind of rustic, old guitar tee shirt look....

maybe?

eh?

ooooh now you see where I was going...

gotcha!

I used one of my old stretchy tees from the Target clearance rack for the shirt sleeves and applique. Then I cut up a truly
Old Navy blue tank top that I couldn't even get over my shoulders anymore for the body.


I love the baseball tee spin on my basic pajama top pattern that made it look like an everyday long sleeve.

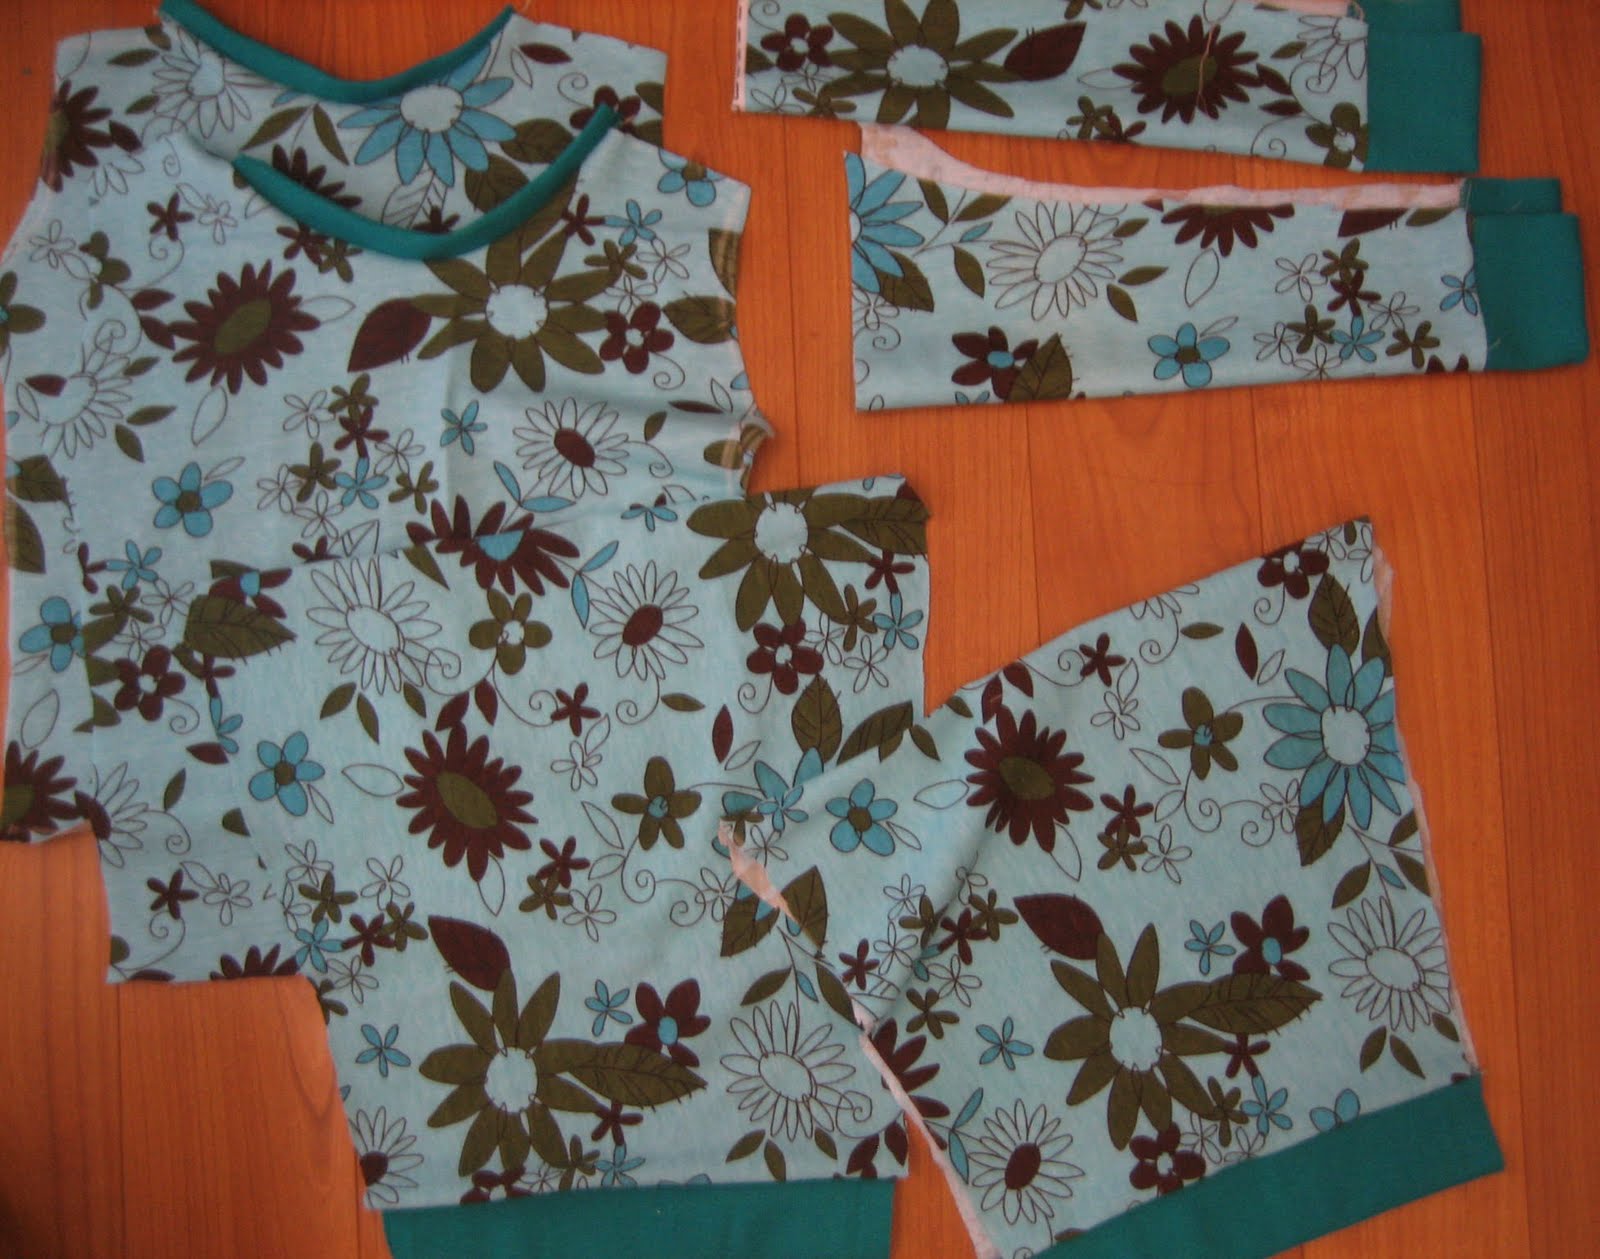
I made sure to cut the sleeves and the bottom of the shirt along the original tee-shirt hem, so I saved a step in the hemming process!

Turns out that moments after I dressed the model for his photo op his generous sister offered him a stashed away animal cookie from her pocket... and well, you can imagine how lovely the new shirt looked after his first nibble.

So you'll have just to imagine the mini guitar hero in his rockin' new shirt until it comes out of the wash...

Wednesday, September 22, 2010

20 minute leggings tutorial with an optional flair!

Super stylin' leggings in less time than it will take to read this post??

Yes, please!

As far as I'm concerned leggings are a staple fall item for girls. They're comfortable, easy to mix n' match with and, let's just be honest, what toddler tush doesn't look irresistibly pinchable in little leggings?

I'll show you how to make your own pattern, sew the leggings...and... if you have an extra 10 minutes of sewing time I'll show you how to add a little trendy scrunch to bottom of the legs.

Here's what you need:
  • Stretchy fabric, interlock would be the best, but any light to medium weight knit should work.
  • Waistband elastic to fit your child's waist
  • Normally sewing goods, thread, pins, machine etc....
  • An old pair of leggings to use as your pattern
  • 20 minutes!
  • About 12-15 inches of very thin elastic for the optional scrunched legs

Here's what you do:

Step 1: Make your pattern
Fold the old pants in half and lay the outside of the old pjs along the fold of the fabric.
Using a piece of chalk trace along the edges of the pants leaving about 1/2 in gap for seam allowance on all sides except the waist. About 2 inches before you get to the waist of the pants, start angling outward so that you end about 1 1/2 inches away from the side of the old pant's instead of the 1/2 that you were doing before for seam allowance. This will give you a little extra room to gather for your waist band. Next, you'll want to trace 2 1/2 inches up from the top of the old waistband to leave enough room to make a casing for a new one.

Repeat for the other side of the pants. I like to cut out the first pant leg first and then use that as a template to trace the other half of the pants.

Step 2: Hem the bottom of the legs
Save yourself some time later and just hem the bottom of the pants now while they're open.

Step 3: Sew the sides of the leggings together
Lay the pant legs flat with same sides together, so it looks kind of like a diamond. Sew each of the top sides of the "diamond" from the waist end of the pants down to the crotch.
When you're finished lay the pants out flat with the seams down the center and the folded parts outward for the sides of the leggings.

This is the same technique I used to sew my pajama pants, you can see more pictures of what I mean here.


Step 4: Sew the crotch and legs together
I like to do this by starting at the foot of the leg and sewing up toward the crotch and straight across to the foot of the other leg, so you don't have to start and stop.

Step 5: Sew the elastic onto the pants
Fold down the top of the pants to make a casing for an elastic waistband.

Sew
together leaving an opening to pull the elastic through before sewing the entire casing closed.


VOILA!!

Step back and admire your quick and easy leggings :)

That was just too quick, I know you want more...

Just go ahead and fancy it up with a scrunchy bottom twist!

You have 10 more minutes before you haaave to grab that screaming child :)

This is easy too, here's all you do:

Step 1: Cut your elastic
Fold the leggings inside out and cut 4 strips of thin elastic about 4 inches each for a scrunch 6 inches into the legging. This will let the leggings rest mid-calf for most pants.
Since I needed these for our upcoming trip to a very cold place, I decided to pre-cut my standard leggings extra long, so they would come down to the ankle after I scrunched them. I just added another 3 inches to the length of the old leggings.

Step 2: Pin the elastic to each side of the ankles
Mark the pants about 6 inches from the bottom up and pin one end of the elastic there at each side of the leg. Continue pinning down along the elastic until you hit the bottom of the leg.


You'll want to do this by pinning in sections since the piece of elastic is smaller than the area you'll be scrunching. To pin in sections, start by pinning both ends and section off in half again and again until you can't pin anymore!


Step 3: Sew the elastic in place
Sew the elastic on each side of the leg by carefully removing the pins just before they reach the foot. *Note* in this picture I removed them all to demonstrate that you should stretch the elastic by gently pulling on each side as you sew.

Make sure to hold both ends of the elastic as you stretch, so that you don't yank the needle out by pulling too hard.

It should look like this on the inside when you're finished. You'll probably notice that I used a straight stitch here instead of a zigzag like you typically do for elastic. I found that it was easier for me to control stretching the elastic this way, and I figured, since it's not really needing to stretch over anything it actually doesn't need the flexibility of the zigzag like it would on a waistband or something. I think.... :)

And there you have it...
Basic leggings made a little extra fancy!

And when you're feelin' fancy who isn't up for a game of hop scotch?


That is, I suppose, until your partner takes up laying in the grass instead...


Ah oh well, what can you do when your partner is only a baby?

I guess she was happier just drawing with the chalk to begin with...

Monday, September 20, 2010

Thrifty Goodness!

I had such a good thrift store weekend that I couldn't help showing off some of my new loves!

Ladies and gentlemen, feast your imagination on how deliciously adorable Jonah will be in this...


Complete with a little black bow tie


Price tag- $15
(Original tags say it retailed for $75!)

Then I stumbled upon just the perfect thing to really make the girls "ooooh and aaah"...

Price tag- $1

ONE DOLLAR!!

That's a S.T.E.A.L


The catch....

The shoes are size 7 and Jonah is currently a size 3 maybe 4 with thick socks....

But the good news for that is that the tux is ironically also a little too big by almost the same factor...

But hey, at least they'll both fit just right at the same time!


Then on Sunday.... just when you were thinking why buy something a year too big??

Ooooh baby, just wait for this part!!

On Sunday I decided to browse around one of my other favorite 2nd hand baby shops and found this:
Size: 12 months!

Just. right.

Price tag: FREE!

Ok, ok, fine, not technically free I suppose. I sold a bunch of stuff on consignment there and snagged this one for $2.49 worth of credit, which is pretty darn close to free for tux pants and a vest. And pretty much free, because I still don't really believe someone actually bought some of the clothes I took there, so I'd say I more than doubled my gain :)

Now, it gets even better.... I brought it all home and tried it on the little stud and I definitely think I'll be able to temporarily hem the tux jacket to fit now, but still be able to take it back out to fit him again later!

So why all the formal wear? We have a wedding to go to soon and what better time to show off your kids?!

So yes, he will be able to sport the dapper digs to the big day... weeee heee heee!!

Watch out Mr. Groomy.... he'll be a sight for your bride's sore eyes!!

I mean, yes, he'll... uh... wear something modest, humble and quiet.... like his mother's personality.


Thursday, September 16, 2010

Little Mr. Fix It Long Sleeve Tee

If you can break it, you should learn to fix it!

That's right. It's a hard knock life in DIY land.

We start 'em young.

And to prove my point I er... made a long sleeve shirt with tools on it?

Ok, not you're buying it. I don't blame you.

But we do try to let the kids tinker a little with us while we're working on home improvement and craft projects. Jonah is a mean chewer of screw drivers and you should see Sienna sew a button! At 2 years old, I'm just really impressed she gets the needle through the hole. Needle! Yikes! Don't worry, she has a child's plastic one she plays with under close supervision by me while intensely absorbed in my own sewing nearby :)

Ok, ok, enough with the jokes. We're happy to admit that we're trying to force encourage our kids to get into on our hobbies too. And naturally, we get a huge kick out of dressing them for the part.

Hence the real motivation for the cute little long sleeve tool man t-shirt!

With a little saw, hammer, nut, bolt, and carpenter's square on it.

I used the same pattern and instructions for my new pajamas that you can check out here to make this long sleeve shirt out of an old t-shirt.
I made this one even easier by cutting out the existing neck from the old t-shirt to use as ribbing for the neckline instead of making my own.


Instead of ribbing for the sleeves and finishing the bottom of the shirt like I did for the pajamas I simply cut the pattern for the body and sleeves along the original t-shirt hemming.

Easy peasy!


I free handed the tools for the applique and sewed them onto the front of the shirt before sewing the sides together.
It's hard to tell in these pictures, but I straight stitched the saw blade a 1/4 away from the edge so it will fray slightly in the wash and look like a real blade!

I think the little tool man was so excited to get something made for him that he was more than willing to pose for a photo op.

He actually got quite into it.


Should I stand like this? With the one leg out?


How about if I turn slightly like this?


Hand up with a slight smile gazing past you in the distance??

No, no, that's too much.

How about this?

Wait, is that a bug over there?!!

Can we be done now?

He did good. It's hard to bribe a 10 month old for very long....


Tuesday, September 14, 2010

How to sew with knits or stretchy fabric

If you feel like sewing with knits is a stretch check out a few of these tips and tricks I so wisely know have discovered by accident that seem to make those darn stretchy fabrics play nice!

Check out:
#1- Needle, needle, needle
#2- Set the right stitch type and length
#3- Tame those hungry feed dogs
#4- Thread Counts
#5- Release a little tension would ya?


#1- Needle, needle, needle

The type of needle you use on your machine is the key to success above all else. Especially for light weight knits and jersey fabric (like t-shirts). I use a ballpoint needle (sometimes called a Jersey needle), but you can also use a stretch needle. These fancy needles have a rounded point that penetrates the fabric without catching or cutting through the yarns.


#2- Set the right stitch type and length

I'm sure you've heard a zigzag stitch recommended when sewing elastics or knits and it's because the zig lets the stitch flex and give a little with the movement of the material. This makes it easy because you don't have to stretch the fabric as you sew. The best setting for a zigzag machine is the narrowest zigzag setting (.5mm on many machines) and a stitch length of 2.5mm to 3mm. For those super thick knits you can use a longer stitch length.

For those with a straight-stitch-only machine don't worry! Just set your stitch length to a medium (2.5mm-3mm) length and it should work just fine. The only catch is when sewing knits with a straight stitch, you need to very carefully and evenly stretch the fabric from both ends. This doesn't have to be a tug-a-war, you just slightly and gently stretch the fabric as it goes under the presser foot. Make sure you're not pulling on one end or the other though, because you could end up pulling and snapping the needle. Yikes! No matter how cranky your kids are all day I doubt anyone really wants to poke their eyes out with a needle.


#3 Tame those hungry feed dogs!

If you have a differential feed system on your machine count your lucky stars! Your manual should have some info on the best setting for knits. The feed dogs are the little spikes at the plate of the machine that "feed" the fabric through while you sew. This is also what makes the knit fabrics sometimes stretch too much or pucker when they're pulled through too tightly.

How do I know what I have???

Most basic sewing machines have a single feed which feeds all layers through together, at the same time. You can test to see if yours does by taking two of the exact same size pieces of fabric and sewing a seam down the center. After you remove them from under the presser foot check the edges of the fabric to see if they are still aligned. If so, then hooray your feed is working well! If not, well shoot, those dogs are pulling either the top or the bottom piece faster than the other. No big deal, you should be able to check your manual and adjust the feed, but it'll require a little trouble shooting back and forth with test strips until you get it.

Having the feed dogs balanced will help, but if you still have too much pull or puckering you can try easing the pressure on the presser foot. I've also heard, but not yet tested that you can put a piece of paper under the fabric before you feed it through the machine to basically eliminate the feed dogs altogether! I've heard it really helps, but you'll have to make sure you're good at evenly and gently stretching the fabric through on both sides. Then, once you're done sewing you just pull the paper out of the seams.

If you're using a serger and having problems with the knits bunching, pulling or puckering, you can also check your feed dogs. Most sergers come with a differential feed knob that you can turn to strengthen or loosen as needed.

Warning about serging with knits.... the serge stitch takes away most of the stretch in the fabric, so it's actually better to sew neck openings or tightly fitted cuffs with a zigzag so they can stretch with the material over the head, hands or feet.


#4- Thread counts

The type of thread that is. Using the lightest weight possible will limit bunching. Instead of the basic cotton thread see how nylon thread works for you


#5- Release a little tension would ya?

For knit fabrics and most stretch material you'll probably need to loosen the bobbin tension, especially if you're working with cotton thread. Always test on a scrap piece of fabric after making any changes. The best stitches for a knit should lay almost flat with a slight raise. Give the fabric a little stretch to make sure the stitches don't break. If you've gone too loose you'll know because the stitches will form “loops” rather than stitches and won't lay flat.


Other random tips
  • Always pre-wash knits, because they do definitely shrink.
  • Skip the seam finishes! Most knits don't unravel much anyway and the less sewing the less room for unwanted stretch.
  • Spray a little ironing starch on the ends to give them some extra stiffness while you're working.
  • Sounds too basic to even say, but make sure your machine is recently oiled so the thread doesn't have extra pull coming through.
  • Use a double row of stitches on the hem. I'm sure you've noticed that most professional knits use this and unfortunately, they're fancier than most of use SAHM sewers and use a special machine or fancy serger to make this "coverstitch." But even if you don't have a coverstitch most zigzag sewing machines can take double needles, which sews a perfect double row of stitches on the needle side of the fabric and a neat zigzag on the bottom! This stitch has more stretch than a regular stitch and looks impressively professional :) The only drawback is that when you change to a double needle you'll probably have to make some other adjustments to your needle and bobbin tensions. If you want to try this hop over and check out this tutorial for twin needle sewing here.

I hope this helps!

Please email me or comment away if you've discovered any other tips, I'd love to know!!!


And.... just because I can't possibly have a post without pictures I'll seize the opportunity to show you Sienna's favorite moment of all from our little cabin trip last week.

Sitting in an old fashion high chair and eating oreo cookies
(it was a tie between the chair or the cookies)

Drinking her "milk-ooo" out of a fancy Sienna size real glass.

Puckering like a knit fabric when we laughed at her milk mustache.

Trying desperately to hide the "hairs" of her milk mustache to get us to stop giggling at her.

Ooooh kids are so fun, can you blame us for getting our kicks where we can??

Monday, September 13, 2010

FALL in love with a new PJs tutorial

Oh my seasons, fall is in the air!

...ok maybe not quite in Phoenix, but certainly in all the stores and in most normal places around the country....

Regardless, since we plan to visit may of these wonderfully cooler climates in a few weeks I think we better be prepared. And by prepared, I mean... make sure we have ridiculously cute and cozy new pjs to lounge around in at Grandma and Grandpa's house!

And in the meantime to just pretend to wear over here...

Or to simply snuggle and giggle with...

Either way, for that smile I think I'll take it!

This is my first long sleeve top (eck! did I just admit that?!), but it was not nearly as scary as I thought. I used less than 2 yards of fabric, some old hand-me-down boys pjs as a pattern and just over 2 hours, that's it!

Wanna try??

Here's what you need:

  • About 1 1/2 to 2 yards of knit or stretchy fabric depending on the size pjs
  • 1 yard of 1' wide ribbing
  • Old pjs to use as a pattern
  • Sewing machine, thread, pins, iron etc
  • 2-3 hours depending on you

Here's all you do:

Step 1: Make your pattern

Front of the Top
Fold your fabric in half to begin. Fold the old pj top in half and lay the fold you made in the shirt along the fold of the fabric. Fold the arms out of the way along their curved seam as best as possible. Using a piece of chalk, trace the outline of the shirt about 1/2 inches away to give yourself a little seam allowance to work with.

When you get to the neckline, leave some extra wiggle room at the shoulder and lift up the neck slightly to trace just short of the edge of the ribbing.
Like so...

Back of the top

I like to flip the shirt around just above where I traced the front, so that both sides line up at the neck and arm holes. This way I get a better idea of how they're matching up.


Sleeves
Lay the sleeves flat along the fold of the fabric so that top of the sleeve (part without a seam) is against the fabric fold. Trace about 1/2 inch away from the bottom and end of the old sleeve with chalk stopping just beyond the beginning of the ribbing. No need to give seam allowance at the top of the sleeve since you don't need to sew it.

Pants
Fold the old pants in half and lay the outside of the old pjs along the fold of the fabric.
Using a piece of chalk trace along the edges of the pants leaving about 1/2 in gap for seam allowance on all sides except the waist. About 3 inches before you get to the waist of the pants, start angling outward so that you end about 2 1/2 inches away from the top of the old pant's waistband. Next, you'll want to trace 2 1/2 inches up from the top of the old waistband to leave enough room to make a casing for a new one.

Since we're not using exact science here, I like to cut out the first pant leg first and then use that as a template to trace the other half of the pants.
The nice thing about that is you can just cut right along and save yourself the chalking!

Step 2: Measure and cut the ribbing

Unfold the sleeves and pant legs you cut and lay them on top of a strip of folded ribbing.
Mark the width of ribbing you'll need and cut strips for the end of both sleeves and pants.

Repeat for the neckline of the front and back of the shirt. The neck ribbing will lay flat if you cut it slightly shorter than you actually need. Don't ask me how this works, it just does.
Then once you pin your slightly short neck ribbing strip you can stretch it to match the ends of the shirt like shown above.

Step 3: Sewn the ribbing to all your pieces

You can use a serger or a zigzag stitch on your sewing machine to avoid the raw edges as you attach the pieces of ribbing to each part of the pjs.
Iron all of the seams open like so...

Step 4: Sew the pants together

Lay the pant legs flat with same sides together, so it looks kind of like a diamond. Sew each of the top sides of the "diamond" from the unribbed end of the pants down to the crotch.
Open the pants so the seams are on the front and back and of the pants.

Sew the pant legs and crotch together. I like to do this by starting at the foot of the leg and sewing up toward the crotch and straight across to the foot of the other leg.

Step 5: Sew the elastic onto the pants

You can fold down the top of the pants to make a casing for an elastic waistband, or simply use a wider band and leave it visible like this...

To do that all I did was match the edge of the elastic band to the edge of my pants. Since the fabric will be wider than your elastic you need to pin the elastic in sections starting with 4 big sections and working your way down like I showed in my 20 minute skirt tutorial.
Serger or zigzag stitch the elastic to the pants and you're already done with the waist!

Step 6: Sew the top together

Start by sewing shoulders together. Nothings special, just match up and go!

Next, line up the sides of shirt and stitch or serger together, stopping at the armpit.

Step 7: Sew and attach the sleeves


Sew the sleeves together inside out. Make sure the ribbing lines up at the end of the sleeve.

Turn the body of the top inside out. Poke the sleeve through the armhole with the sleeve right side out. I know this sounds backwards, but it works.

Begin carefully pinning the sleeve to the arm hole by matching up the seam lines on the bottom of the sleeve to the seam lines along the sides of the shirt.
It should look like that.

Carefully fold right side out with the sleeves pin to make sure you've done it the right way. When you're all cleared go ahead and serge or sew it together. Repeat for the other side.

Step 8: Finish shirt bottom

To match my exposed elastic waist, I decided to finish the bottom of the shirt with a quick rolled hem, but if you left enough room you can fold and hem as normal too.

Woohoo!

You're already done!!

Just because I couldn't resist her contagious excitement over fancy new pjs I caved when she begged to wear them to bed tonight.


I know, I know, I'm already planning on waking up and change her when she's too hot to sleep in the middle of the night....

Or we could turn our AC waaaay down low... hum, tempting considering that I'd sleep really well too, but then where would the money saved on sewing my own pjs be?


The things us mothers do to see our kids loving the clothes we make them!
Related Posts with Thumbnails